 Start with a blank square canvas of 600 x 600 Pixels.
Step 1. Set your foreground color to the color of your choice and use the Paint Bucket tool to fill the canvas with it.
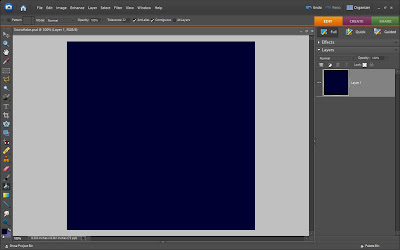 Step 2. Reset the foreground color to black. Choose the Line Tool and set the width to 1 pixel. Draw a diagonal line across the image, right click on that layer in the Layers Palette, and select "Simplify Layer".
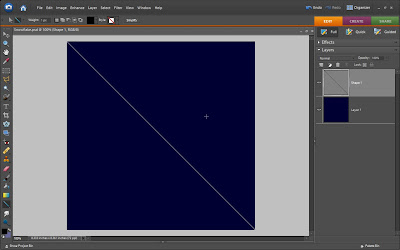 Step 3. Choose the Magic Wand Tool and click on one of the triangles that you created when you drew the diagonal line. In the Layers Palette, click on the bottom layer (the blue) and press "delete".
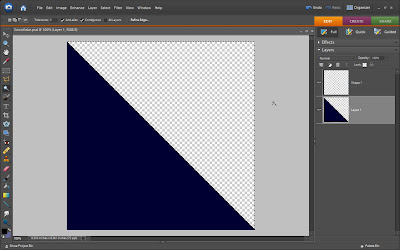 Step 4. Click on the diagonal line and delete it, too. Now you should just have a blue triangle and a transparent triangle. Click on the edge of the canvas to bring up the Free Transform Options. At the top of the screen where it says "W 100% H 100%" uncheck the "Constrain Proportions" Box and change "W 100%" to "W 50%". Now your triangle should look like this.
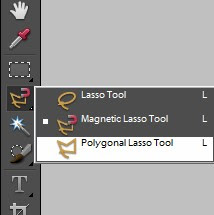
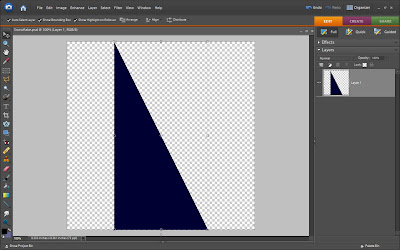 Step 5. Choose the Polygonal Lasso Tool and "Add to Selection" in the top of the window. Draw a few random shapes on the triangle, but no more than four or five. Make the shapes as simple or intricate as you like. If you look below, you'll see that I drew both.
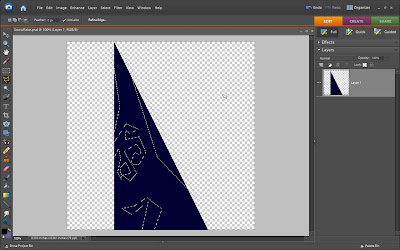 Step 6. Press delete.
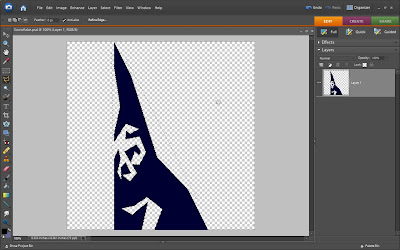 Step 7. Now to create some really interesting groves in your snowflake. Select the Elliptical Marquee Tool and make a circle anywhere on the canvas. With the Elliptical Tool still selected, go to the top of the window and click on "Subtract from Selection". Draw another circle overlapping the first circle. This will take away part of the circle, leaving you with a crescent shape.
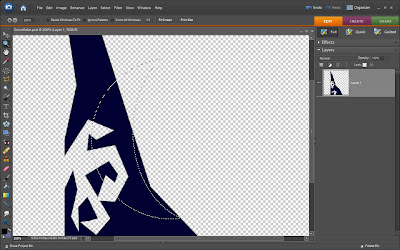 Step 8. Move the crescent to wherever you want to make a new grove in the snow flake and hit delete. Do this a few more times with other crescent shapes. Here's what I came up with.
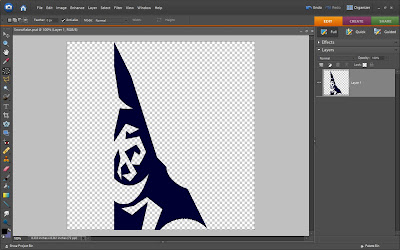 Step 9. Now that we have our cutout, we need to make it into a snowflake. Right-click anywhere on the image and select "Duplicate Layer". Then go to Image > Resize > Canvas Size and change the width and height to 250 percent.
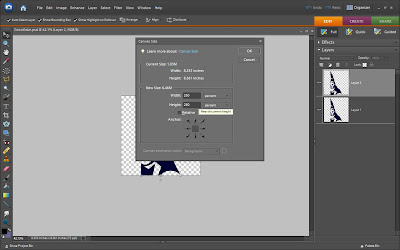 Step 10. Select the Free Transform box around one of the layers (it doesn't matter which layer) and deselect the "Constrain Proportions" box. Put a minus sign before the 100% in the "W: 100%", so that it now reads "W -100%". The layer will flip horizontally.
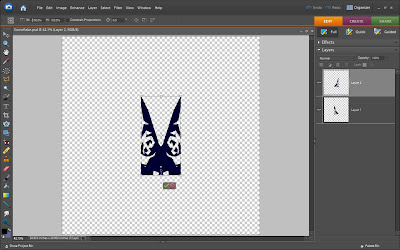 Step 11. Move the top layer to the left so that the shape becomes connected and symmetrical. You may also want to rotate the top layer by 60 degrees or so to come up with a more interesting shape. Make sure that both layers are lined up to one another perfectly.
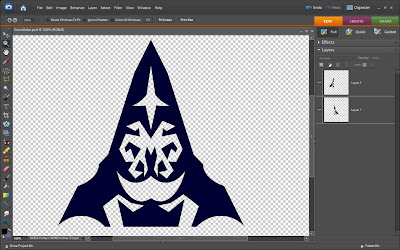 Step 12. Choose both layers in the Layer Palette and right click. Select "Merge Layers" and they will turn into one layer together. Duplicate this layer five or six times.
Step 13. All but one of the layers now need to be rotated by a specific number of degrees. To figure out what numbers to use, divide 360 (the circumference of a circle) by the number of layers you have. I used 5 layers so I divided 360 by 5, which equals 72 degrees. So for the first layer I rotated (layer 2), I used 72 degrees. For Layer 3, I used 72+72= 144 degrees. Then for the last two layers, I rotated them -72 and -144. This creates a full circle. Refer to the images below.
Layer 1 was left as it was, and Layer 2 was rotated 72 degrees.
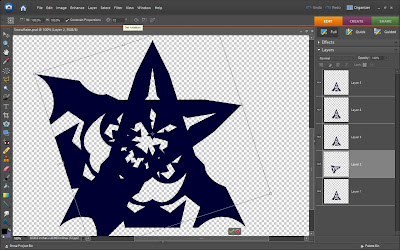 Layers 3-5 were all rotated according to the above instructions.
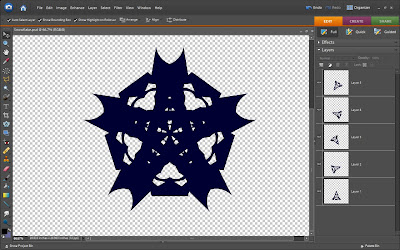 Step 14. Move each layer into position so that they're touching each other in the very middle.
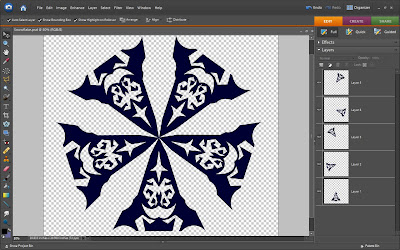 Now that you have your technique, you can create lots of beautiful, unique snowflakes. I'll be posting a tutorial on using these snowflakes to make a Winter Wonderland Background soon.
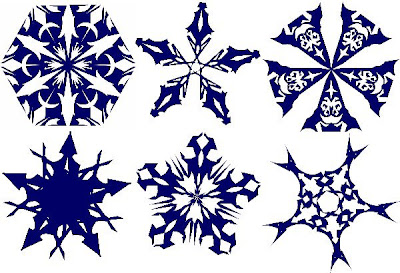 Here are some of the snowflakes I came up with using this technique.
 Step 2. Reset the foreground color to black. Choose the Line Tool and set the width to 1 pixel. Draw a diagonal line across the image, right click on that layer in the Layers Palette, and select "Simplify Layer".
 Step 3. Choose the Magic Wand Tool and click on one of the triangles that you created when you drew the diagonal line. In the Layers Palette, click on the bottom layer (the blue) and press "delete".
 Step 4. Click on the diagonal line and delete it, too. Now you should just have a blue triangle and a transparent triangle. Click on the edge of the canvas to bring up the Free Transform Options. At the top of the screen where it says "W 100% H 100%" uncheck the "Constrain Proportions" Box and change "W 100%" to "W 50%". Now your triangle should look like this.
 Step 5. Choose the Polygonal Lasso Tool and "Add to Selection" in the top of the window. Draw a few random shapes on the triangle, but no more than four or five. Make the shapes as simple or intricate as you like. If you look below, you'll see that I drew both.

 Step 6. Press delete.
 Step 7. Now to create some really interesting groves in your snowflake. Select the Elliptical Marquee Tool and make a circle anywhere on the canvas. With the Elliptical Tool still selected, go to the top of the window and click on "Subtract from Selection". Draw another circle overlapping the first circle. This will take away part of the circle, leaving you with a crescent shape.
 Step 8. Move the crescent to wherever you want to make a new grove in the snow flake and hit delete. Do this a few more times with other crescent shapes. Here's what I came up with.
 Step 9. Now that we have our cutout, we need to make it into a snowflake. Right-click anywhere on the image and select "Duplicate Layer". Then go to Image > Resize > Canvas Size and change the width and height to 250 percent.
 Step 10. Select the Free Transform box around one of the layers (it doesn't matter which layer) and deselect the "Constrain Proportions" box. Put a minus sign before the 100% in the "W: 100%", so that it now reads "W -100%". The layer will flip horizontally.
 Step 11. Move the top layer to the left so that the shape becomes connected and symmetrical. You may also want to rotate the top layer by 60 degrees or so to come up with a more interesting shape. Make sure that both layers are lined up to one another perfectly.
 Step 12. Choose both layers in the Layer Palette and right click. Select "Merge Layers" and they will turn into one layer together. Duplicate this layer five or six times.
Step 13. All but one of the layers now need to be rotated by a specific number of degrees. To figure out what numbers to use, divide 360 (the circumference of a circle) by the number of layers you have. I used 5 layers so I divided 360 by 5, which equals 72 degrees. So for the first layer I rotated (layer 2), I used 72 degrees. For Layer 3, I used 72+72= 144 degrees. Then for the last two layers, I rotated them -72 and -144. This creates a full circle. Refer to the images below.
Layer 1 was left as it was, and Layer 2 was rotated 72 degrees.
 Layers 3-5 were all rotated according to the above instructions.
 Step 14. Move each layer into position so that they're touching each other in the very middle.
 Now that you have your technique, you can create lots of beautiful, unique snowflakes. I'll be posting a tutorial on using these snowflakes to make a Winter Wonderland Background soon.
 Here are some of the snowflakes I came up with using this technique.
NOTE : ALL CREDITS FOR THE ORIGINAL TUTORIAL MAKER :)
=================================
=== For more tutorials keep visiting ;) ===
= http://photoshop-manic.blogspot.com =
=================================


