Monday, February 2, 2009

Advance Screening effect with photoshop

Final Image:

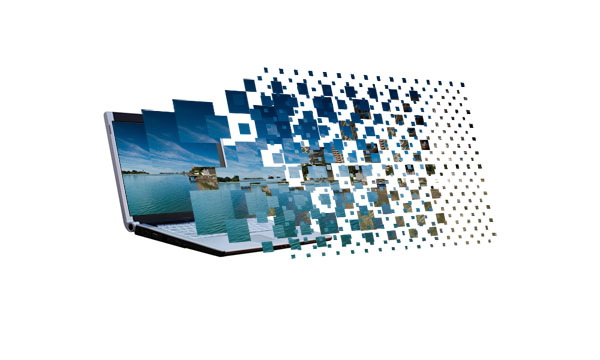
Here is the final image that we will be creating:

Step 1:

Open up a new document 1000px wide and 600px high. Then paste an image of a laptop into your document. Create a new layer set called ‘laptop’ and put the layer containing your laptop image into this layer set.

Step 2:

Now I want to create a vanishing point for the screen of the laptop. Many Photoshop users, including myself, don’t yet have Photoshop CS2 or CS3, so this tutorial won’t utilize the useful vanishing point filter available in these versions. Instead, we’re going to manually create a fake vanishing point.

Select the screen part of your laptop using the lasso tool. Then copy your selection, create a new photoshop document, and paste in the selection. Go to image>image size and double whatever your image size is. In this case the original screen was 204px wide, so I simply doubled this to 408px.

Then paste this new larger screen back into your original document. Positioning it roughly where you think it looks good in terms of perspective.

Step 3:

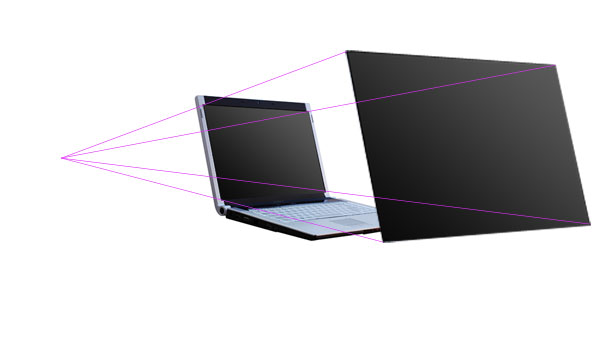
Now select your line tool and a nice bright color for it and draw lines each corner of your large screen through to the matching corner of the original screen and past to a vanishing point. Do this with each corner of the laptop screen, until you have something like the image below:
Step 4:

Now duplicate your larger laptop screen and select edit>free transform. Then in the menu near the top of your screen (see diagram below) change the W (width) and H (height) percentages from 100% to 90%.

Move this resized image so that it matches up with the perspective lines that you created earlier. Be sure to place this resized screen layer behind the largest screen layer but above your original laptop photo layer.

Repeat this process of duplicating/resizing/aligning using the resizing percentages of 80%, 70%, and 60% from your large screen layer. Remember that your original laptop photo is 50% of this large screen layer.

This is how your image should look after you have created this new screens and lined them up correctly:

Step 5:

Now create a new layer set called ‘photo 1′. Paste in the image that you want to manipulate. View a grid over your image and then use the free transform tool to resize your photo to fit nicely into the grid squares. Make sure that the photo fits into an even number of grid squares for it’s height and width. In this example the photo is resized to be 8 grid squares wide and 6 high.

Step 6:

Now duplicate your photo layer, as you want to retain a copy. Be sure to hide the duplicate layer and go back to your original. Select your single column marquee tool from your selection palette (it’s under the Rectangle and Elliptical marquee tools). Using your grid click the grid line that marks the center point of your image and delete a central 1px column. Then switch to the single row marquee tool and do the same to delete a 1px line across the center of your image. You want these lines to be a little larger than 1px though, so grab your magic wand tool and click somewhere outside of your photo image. This will select all of the area surrounding the photo, but also the 1px lines cutting through it. Then go to select>modify>expand and expand the selection by 3px. Then hit delete to achieve an effect like the image below:

Step 7:

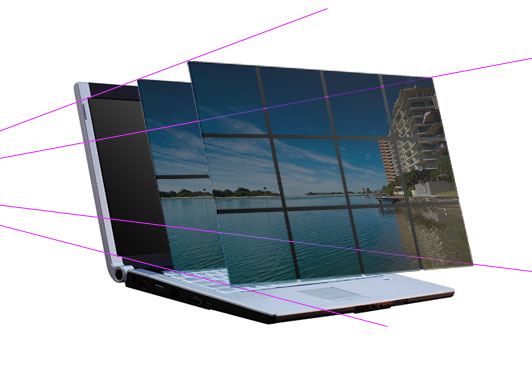
Now hide all of your duplicate laptop screens except the smallest one (the one that is 60% of the size of your largest). With your photo layer selected (the one you’ve just cut up using the grid) go to edit>transform>distort and distort the photo so that it fits exactly over this smallest laptop screen image. To fit it well you make need to reduce the layer’s opacity to allow the screen underneath to show though. The image below shows the transformed photo layer at 57% opacity, allowing some of the screen underneath to show through. Be sure to move this photo layer below the next largest laptop screen layer, so that it is mostly covered by it.
Step 8:

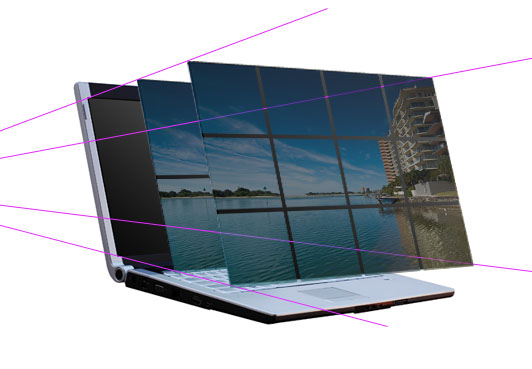
Now go back to your original photo layer. Duplicate it again, and using the same technique as before with the single row/column marquee tools cut it into 2X2 squares using the grid. As the image is 8 squares wide and 6 high, this will result in 12 squares each 4 grid squares in size. Again, use your magic wand tool to select the area around the photo and the lines cutting through it, then expand your selection by 3px and hit delete. Then use the distort transform tool to fit your new image to the 2nd smallest laptop screen. Remember again to move this photo layer behind the next largest laptop screen layer. The image below shows the result of this, with the photo layer again at 57% to allow me to nicely fit it to the screen image beneath.
Step 9:

Now repeat these steps, but make your squares half the size each time. So using the grid that will then be 1X1, 1/2X1/2, 1/4X1/4. To cut the photo into 1/2 and 1/4 grid square pieces I would recommend just using your judgement, but if you want to be really picky you can use rulers. Another tip is to duplicate the photo after cutting it into the squares, as this will save you having to repeat the slicing process right from the start each time.

Step 10:

Here is the same image but with all duplicate laptop screen image layers hidden and all photo layer’s with 100% opacity.

Step 11:

Now is the time-consuming part. Hide all of your photo layers except for your smallest photo layer. Use your magic wand tool set at 255 tolerance to select entire squares and delete them to leave a checkerboard effect. To do this simply go down each column deleting squares, being sure to leave a square remaining between each two that you delete. Then move onto the next column and repeat, but make sure that no squares you delete are next to an already deleted square, deleted squares should be diagonal to each other. The image below shows the various stages of doing this with each photo layer:

Step 12:

You should still have your original photo layer, as it was duplicated for safe keeping near the start of the tutorial. Duplicate the layer again, and move it so that it is the first layer above your laptop image layer. Then go to edit>transform>distort and fit the photo nicely over the laptop screen. Then hide all of your vanishing point guidelines and make sure that all of your checkerboard photo layers are visible. Seeing as all these layers are within the same layer set select the layer set and drag it to make the graphic more central in your document.
Step 13:

Right click on one of your photo squares layers and click blending options. Apply the drop shadow settings shown below. Then once this has been applied right click on the drop shadow shown in your layers palette, select ‘copy layer style’ and paste the layer style to all of your other photo squares layers. The outcome is shown below:

Step 14:

Now create a new layer set below your laptop/photos layer set called ‘background’. Hide your laptop/photos layer set. Create a new layer and fill it with a white to light gray radial blur.

Step 15:

Paste a metal texture onto a new layer above your radial gradient layer and reduce it’s opacity to 20% for a subtle textured effect.
Step 16:

Now create some bendy lines across your background using the pen tool. Be sure to have a white 1px brush selected and then once you have created your bendy pen line right click on it and select ’stroke path’. Then simply duplicate your line layer until you have multiple white lines across your background. I merged all of my line layers together and reduced the merged layer opacity to 30% for a more subtle effect.

And we’re done!

To finish things off I added some cool text. Click the image below if you want the full sized version.


NOTE : ALL CREDITS FOR THE ORIGINAL TUTORIAL MAKER :)


=================================
=== For more tutorials keep visiting ;) ===
= http://photoshop-manic.blogspot.com =
=================================

Sunday, February 1, 2009

Photo Edge with grunt brush effect

Step1

Welcome back my naughty little monkeys! I was up most of the night with this nasty flu that’s been going around, it’s not even noon and already I’m on my third can of Dragon, so if my writing’s a little off kilter, you’ll understand why. Did I just use the word kilter?

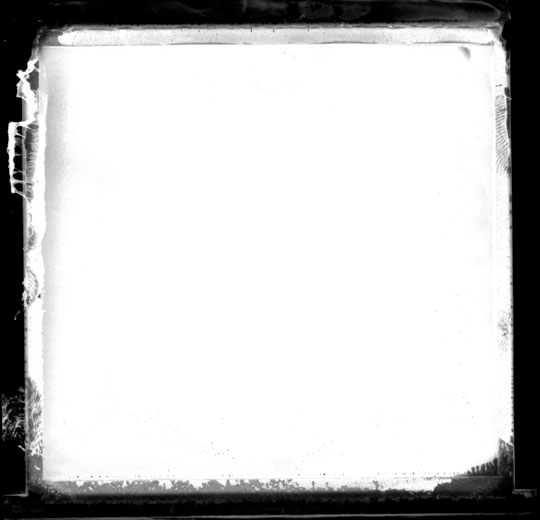
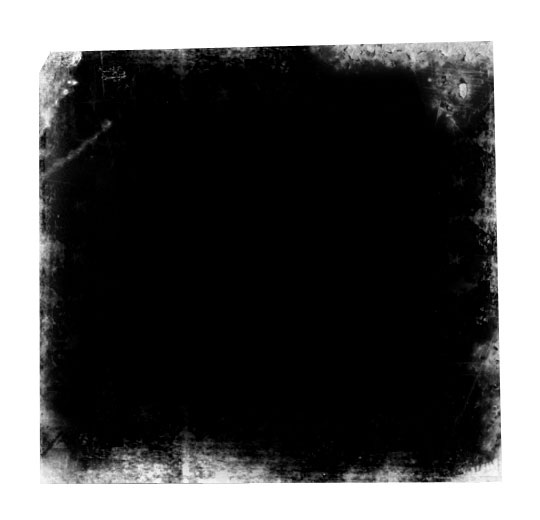
Lets get this party started with a visit to iStockPhoto where I found a cool looking stock image of an old medium format film border. There are tons of these available for free as well if you’re willing to put in the time to search. Incase you want to replicate this exact effect you can enter the product id (1249016) into the iStockPhoto search field. The nature of my contract with iStockPhoto doesn’t allow me to give away the original but if you know where to look, I may have "accidentally" left the associated Alpha Channel in the download at the end of the lesson.

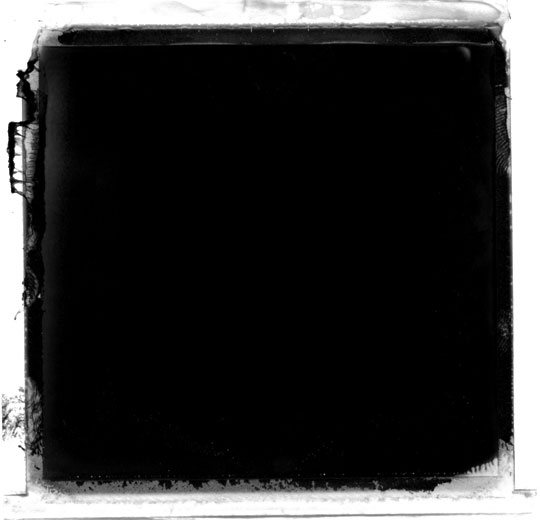
Here’s the image I got from iStockPhoto. Did I mention I got it at iStockPhoto?

2

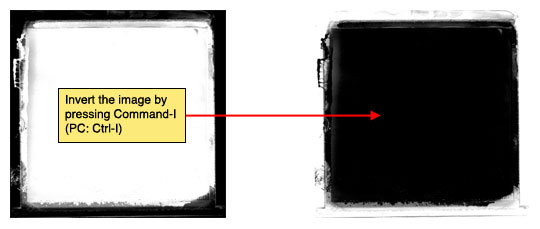
Since I ultimately want to use this image as a mask, lets go ahead and invert the tones by choosing Image>Adjustment>Invert from the main menu, or by simply pressing Command-I (PC: Ctrl-I).

3

What I really want from this image is a true black to transparent mask, but what we’re currently working with is a black and white composite. It’ll take a few steps to do it, but trust me, the result will be worth it. Follow along closely, most of this will be keyboard shortcuts that won’t have any visual reference. Don’t worry, I’ll explain it as we go.

Press Command-A (PC: Ctrl-A) to Select All, then press Command-X (PC: Ctrl-X) to cut the entire image onto the clipboard (Yes, everything will disappear and you’ll be left with a white canvas… it’s ok, that’s what’s supposed to happen).

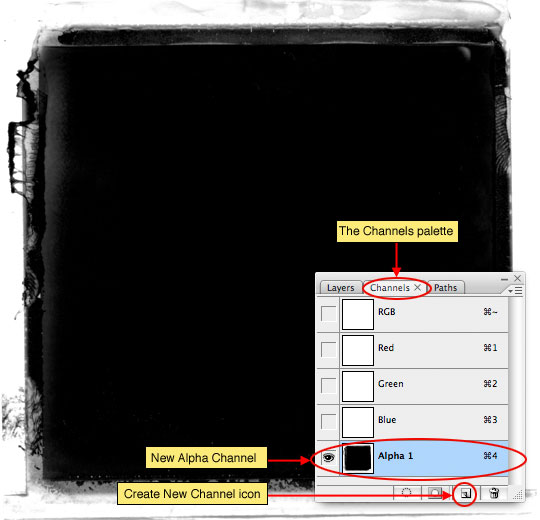
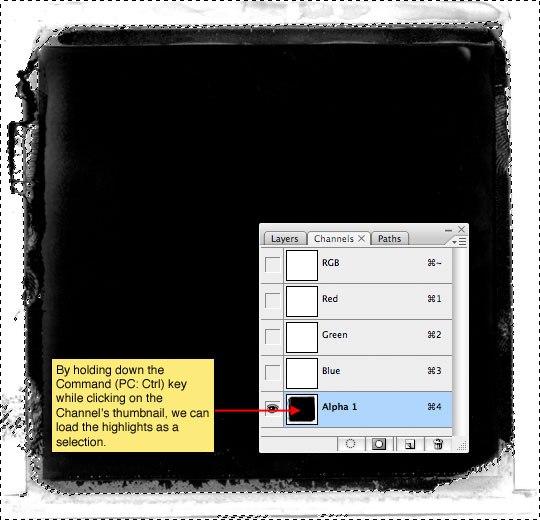
Now click over to the Channels tab in the Layers palette (*note: If your layers palette isn’t open choose Window>Layers from the main menu). Click the Create New Channel icon at the bottom of the Channels palette to add a new Alpha Channel to the bottom of the list of channels. Click on the new channel to select it and press Command-V (PC: Ctrl-V) to paste the image we cut from the stage into the channel.

4

The advantage of having the black and white image in an alpha channel is that it allows us to load the highlights as a selection where a standard layer will not. Lets do that now by holding down the Command (PC: Ctrl) key and clicking on the layer thumbnail of our new Alpha Channel. Although the selection looks rather random and doesn’t seem to encompass all the white areas of the image, it actually does.

5

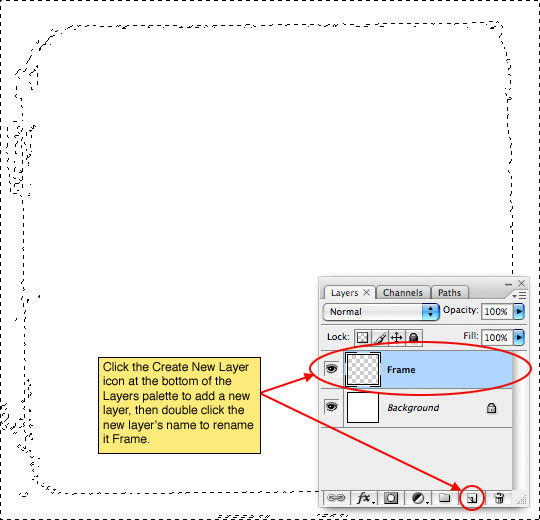
With our selection made, lets click up on the RGB channel at the top of the Channels palette to make it active (*note: this will hide the channel we were just working on and make only the selection visible.

Click back to the Layers tab and add a new layer by clicking the Add New Layer icon at the bottom of the layers palette then double click on the layer’s name to rename it Frame.

6

Since our alpha channel allowed us to select only the highlights but what we really want are the shadows, lets go ahead and invert the selection by choosing Select>Inverse from the main menu or by using the keyboard shortcut Command-Shift-I (PC: Ctrl-Shift-I).

Press the D key to reset your foreground color to black and then fill the selection by pressing Option-Delete (PC: Alt-Backspace). We’re now done with the selection, so you can press Command-D (PC: Ctrl-D) to deselect.

7

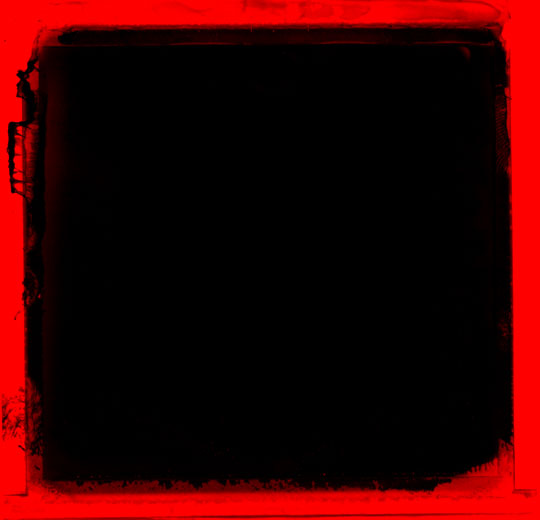
HERO! You might be saying, this looks just like the image we started with! … and of course that would be true, but things aren’t always as they seem. If I change my background color to red (you don’t need to do this, I’m just illustrating my point). You can see that the black has indeed been separated from the white background and is now isolated for use.

8

Ok, we’ve done all the preparation, now lets get to work on the rest of the effect.

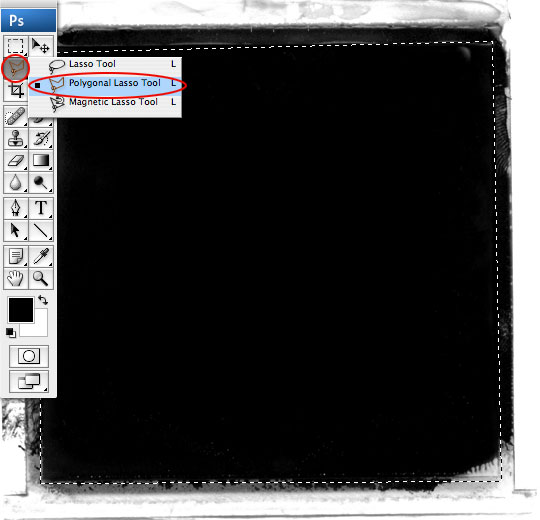
Grab the Polygonal Lasso tool from the Lasso tool fly out menu and clicking from point to point create a nice square selection inside the photo area. This selection doesn’t have to be exact or even, in fact, the less perfect the better. When you get back to your starting point the selection will close itself.

9

Now that the selection is made, lets soften the edges just a touch by choosing Select>Modify>Feather from the main menu (*note: In some older versions of PS the path to the Feather option is Select>Feather.) This is a low resolution example, so I’m going to use a small 2pixel Feather, but if you’re working at a larger resolution you’ll want to adjust accordingly.

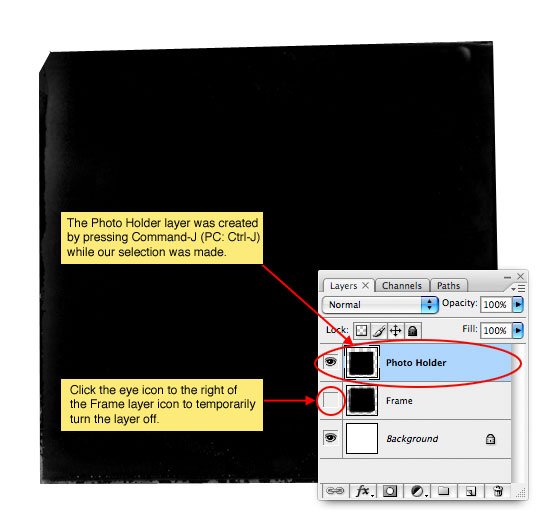
Now lets duplicate the selected portion of the layer by pressing Command-J (PC: Ctrl-J). This will put the selection onto it’s own layer above the original. Lets call this layer Photo Holder. In order to see what we’re working with lets also turn off the Frame layer by clicking the eye icon to the right of the layer thumbnail in the Layers palette.

10

The edges of this layer are far too hard for this effect to be convincing, so lets press the E key to invoke the Eraser tool, and then by choosing different brushes from the brush picker we’ll delete small areas around the edge of the photo area. I used a variety of grunge edge brushes to distress my edges and I’m including those Photoshop Brush sets in the download at the end of the lesson. Yes, you’re right, that is very cool of me!

Here’s my Photo Holder layer after all the distressing. Remember that you can rotate the brush tips in the Brushes palette like I taught you in the Rotating Brushes tutorial to make the brushes work for every edge.

11

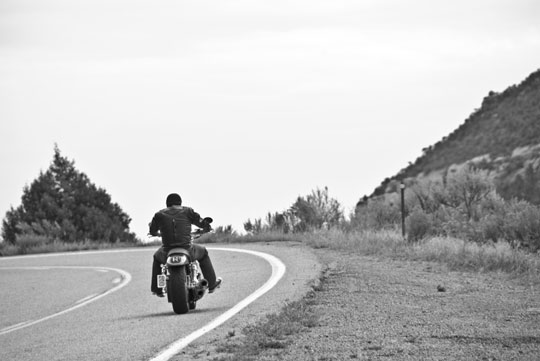
Lets take a break from this file for a moment and open the photo we will use for the effect. Mrs. Hero took this shot of me on a motorcycle trip to Telluride, Colorado last year. Yes, I look cool, I know.

For this effect I wanted to use a grayscale image (though you don’t have to). Because this tutorial isn’t about black and white conversion I just chose Image>AdjustmentS>Desaturate from the main menu to make it easy. If you want to get into black and white conversion in detail, I’d suggest picking up Scott Kelby’s Photoshop Channels Book and reading Chapter 4 in particular which covers using Calculations for B&W conversion (though the whole book is fantastic).

12

With your photo open, press Command-A (PC: Ctrl-A) to Select All, then Command-C (PC: Ctrl-C) to copy the photo to the clipboard. You can now close your photo if you want by pressing Command-W (PC: Ctrl-W). How’s that for a bunch of keyboard shortcuts mashed into a few lines?

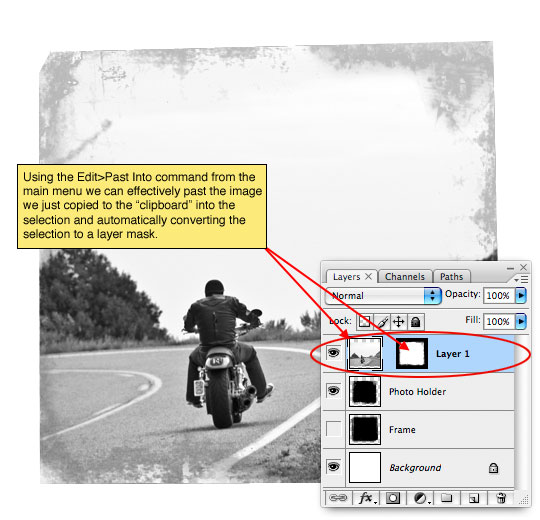
Now that we’ve got the photo copied to the clipboard (no, there’s no actual clipboard, it’s just an expression to let us know that the photo is copied into Photoshops virtual memory), lets return to our working file and more specifically to the Photo Holder layer which should still be selected as the active layer in the Layers palette. And just like we did when we were in the Channels palette, lets go ahead and Command-Click (PC: Ctrl-Click) on the Photo Holder layer icon to load it as a selection.

From the main menu (and this is the cool part) choose Edit>Paste Into. This will take the image we just copied to the "clipboard" and paste it into the selection, creating a new layer and using the selection as a layer mask! How awesome is that?

13

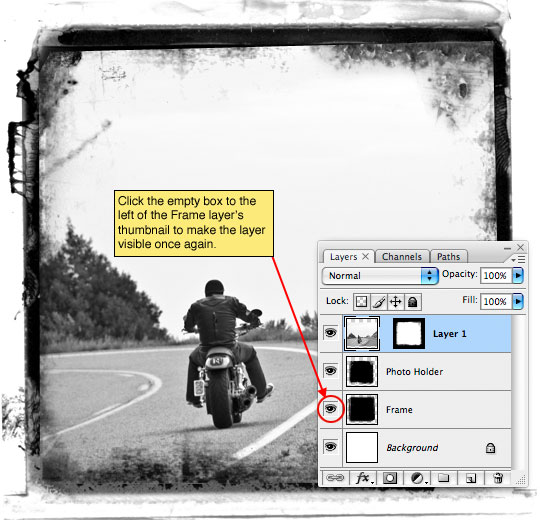
Ok, lets turn on the Frame layer again by clicking in the empty box to the left of the layer thumbnail (the eye icon will reappear long with the layer’s contents). Now technically we don’t need the Photo Holder layer anymore, but I’m going to leave it incase I want to modify it later. I’m also going to name the new layer with the photo on it Photo.

14

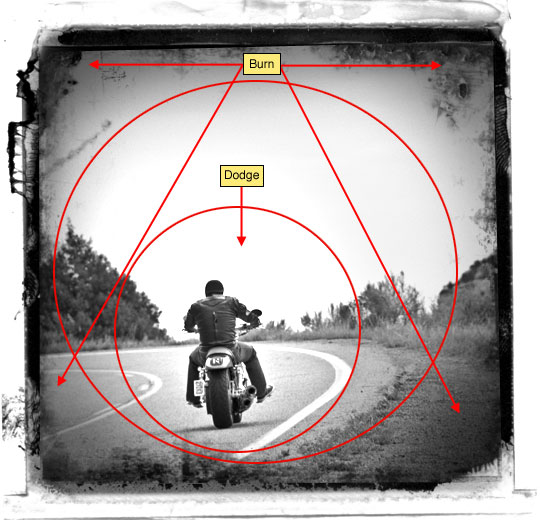
With the photo thumbnail selected on the Photo layer I now used the Dodge and Burn tools (found in the Tools bar / keyboard shortcut O) and using a soft edged medium sized round brush with the Range set to Highlights and the Exposure set to around 20% I’m going to darken around the edges and corners (Burn tool) and lighten around the subject (Dodge tool). This effect mimics the old darkroom techniques of dodging and burning an image to get this style of look. Perhaps the subject of a future tutorial, but I won’t be going into any further detail about the technique in this tutorial.

(*note: Dodging and Burning aren’t necessary steps here, and I’ll use a layer style in the next step to mimic the edge burning anyway.)

15

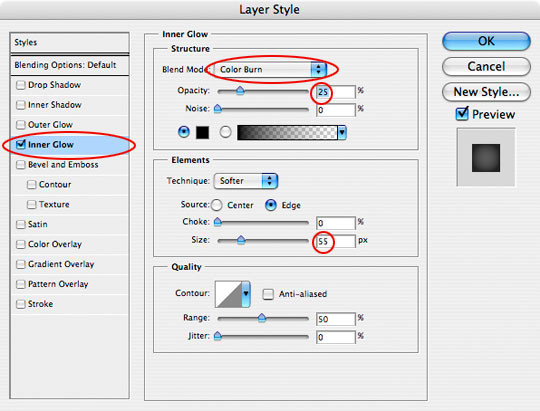
If you don’t feel comfortable using the Burn and Dodge tools too much yet, that’s ok, lets use a layer style to mimic the edge burn effect by double clicking to the right of the layer name in the Layers palette, or by Control-Clicking (PC: Right Click) on the layer and choosing Blending Options to bring up the Layer Styles dialog. Choose Inner Glow from the list on the left (Click on the text, not the checkbox) and add the following settings.

16

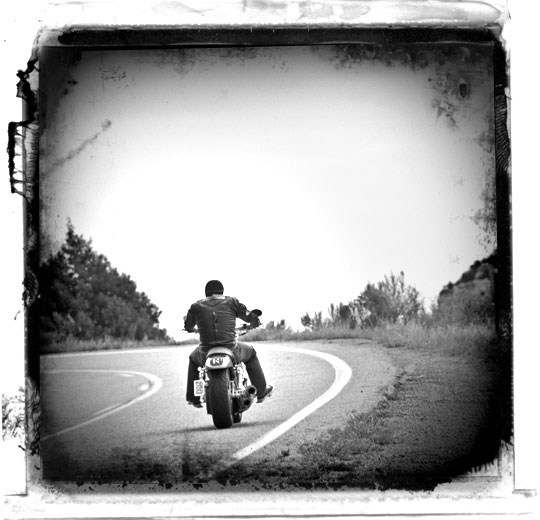
Here’s what my image looks like so far.

17

I want the photo to look a little more aged so I’m going to use a fantastic brush (which is included in the download at the end of the lesson) called Scratch Heavy to do a little more distressing.

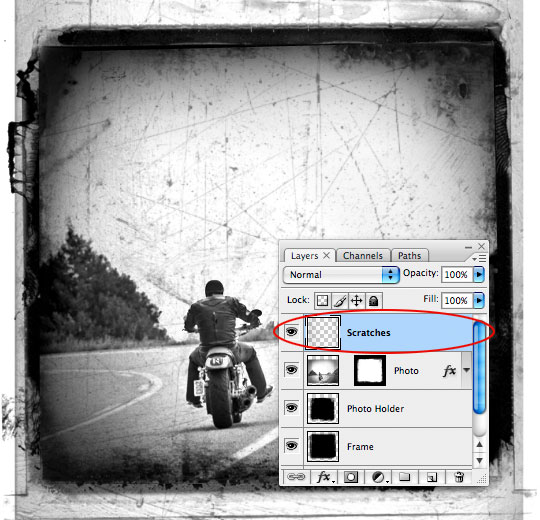
Create a new layer called Scratches, switch to the Brush tool by pressing the B key, load and select the Scratch Heavy brush and press the D key to reset the foreground color to black. I used the bracket keys [ and ] to size my brush to it was just a little larger than my image, then clicked once on the canvas.

18

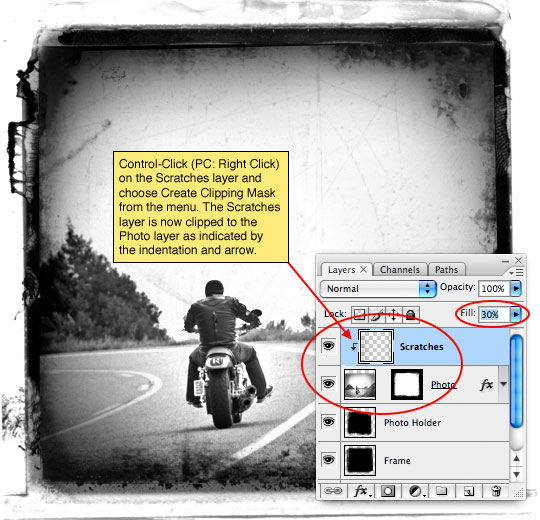
Obviously we don’t want the scratches to extend beyond the borders of the photo, so Control-Click (PC: Right-Click) on the Scratches layer and choose Create Clipping Mask from the menu. This will clip the Scratches layer to the Photo layer and the clipping will be indicated by an indentation of the Scratches layer and a small arrow between the two layers. The scratches are a little harsh though, so lets lower the Fill opacity of the Scratches layer to around 30%.

19

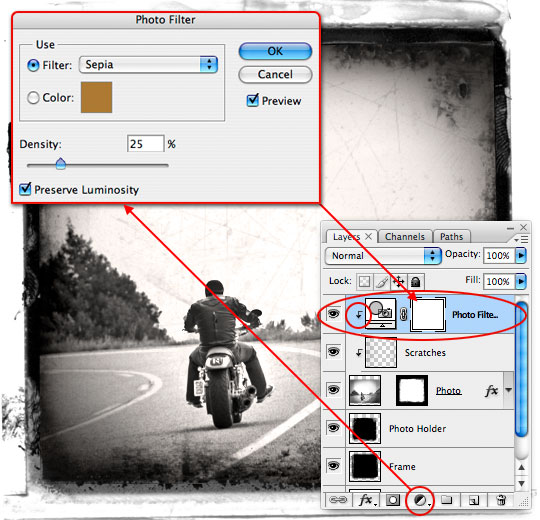
The last thing I want to do is add a little sepia tone to the image just to make it feel a little older. Click on the Create New Fill or Adjustment Layer icon at the bottom of the layers palette, choose Photo Filter and choose Sepia from the Filter drop down menu, leave the other settings alone and click OK. Now just Create a Clipping Mask with this layer as well just like we did in Step 18 and you’re done!

20

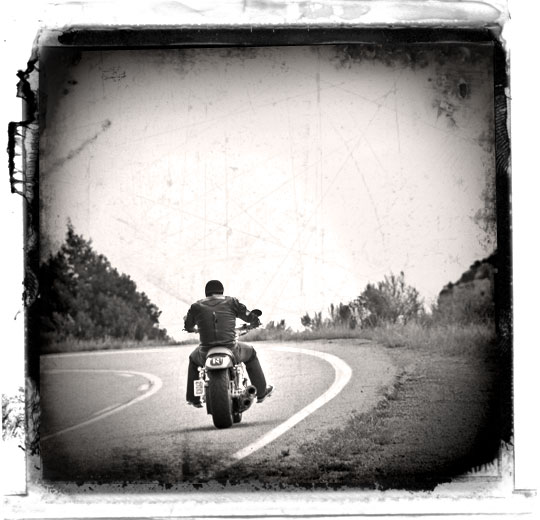
And that’s it folks, a cool aged photo effect with a nifty edge detail. I hope you learned a little something along the way. I’m off to take a nap.


NOTE : ALL CREDITS FOR THE ORIGINAL TUTORIAL MAKER :)


=================================
=== For more tutorials keep visiting ;) ===
= http://photoshop-manic.blogspot.com =
=================================