![]() Click the Rectangular Marquee tool.
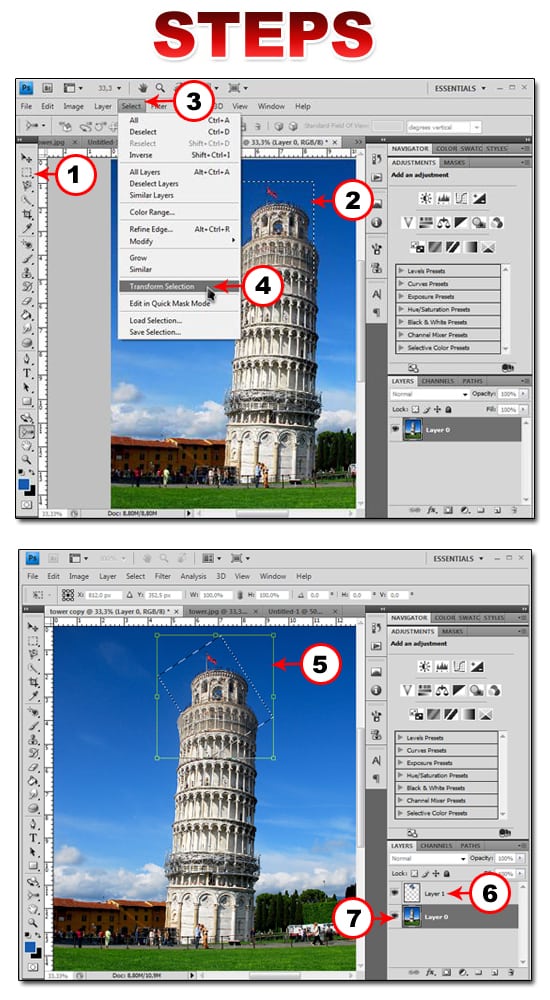
Click the Rectangular Marquee tool.
![]() Click and drag a rectangle in the image.
Click and drag a rectangle in the image.
![]() Click Select.
Click Select.
![]() Click Transform Selection.
Click Transform Selection.
![]() Note: Pressing (Ctrl+T) also adds transformation anchors; however, these transform or rotate the image inside the selection. Transformation anchors appear on the selection border.
Note: Pressing (Ctrl+T) also adds transformation anchors; however, these transform or rotate the image inside the selection. Transformation anchors appear on the selection border.
![]() Click and drag a corner anchor to rotate the selection border.
Click and drag a corner anchor to rotate the selection border.
![]() Hit Enter to apply the transformation.
Hit Enter to apply the transformation.
![]() Press (Ctrl+J) to duplicate the selection to a separate layer.
Press (Ctrl+J) to duplicate the selection to a separate layer.
![]() Select the background layer again and repeat steps 2 to 6 to make any number of separate layers.
Select the background layer again and repeat steps 2 to 6 to make any number of separate layers.

![]() Select one of the layers you duplicated and right click on it, choose Blending Options. The Layer Style dialog box appears.
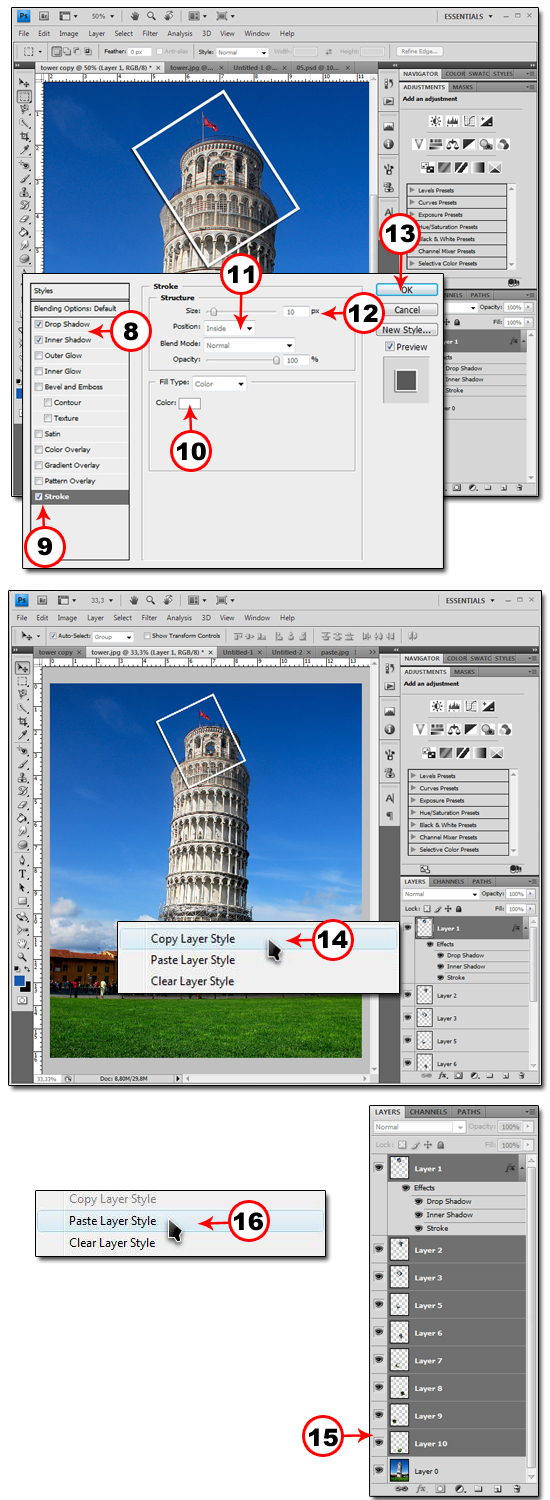
Select one of the layers you duplicated and right click on it, choose Blending Options. The Layer Style dialog box appears.
![]() Click Drop Shadow and Inner Shadow, play a bit with the setting to get the desired result but most of the time the default setting are just fine.
Click Drop Shadow and Inner Shadow, play a bit with the setting to get the desired result but most of the time the default setting are just fine.
![]() Click the Stroke check box.
Click the Stroke check box.
![]() Choose a white color for the Stroke.
Choose a white color for the Stroke.
![]() Choose inside for the Position.
Choose inside for the Position.
![]() Set the Stroke size to whatever you like, for this example a size 10 it’s fine.
Set the Stroke size to whatever you like, for this example a size 10 it’s fine.
![]() Hit OK.
Hit OK.
![]() Right Click on the layer you just created e blending style and choose Copy Layer Style.
Right Click on the layer you just created e blending style and choose Copy Layer Style.
![]() Select the remaining layers by clicking on the first layer holding down the Shift Key and selecting the last layer.
Select the remaining layers by clicking on the first layer holding down the Shift Key and selecting the last layer.
![]() Right click on the selected Layers and choose Paste Layer Styles.
Right click on the selected Layers and choose Paste Layer Styles.
![]() The final image appears to be a combination of many smaller photos.
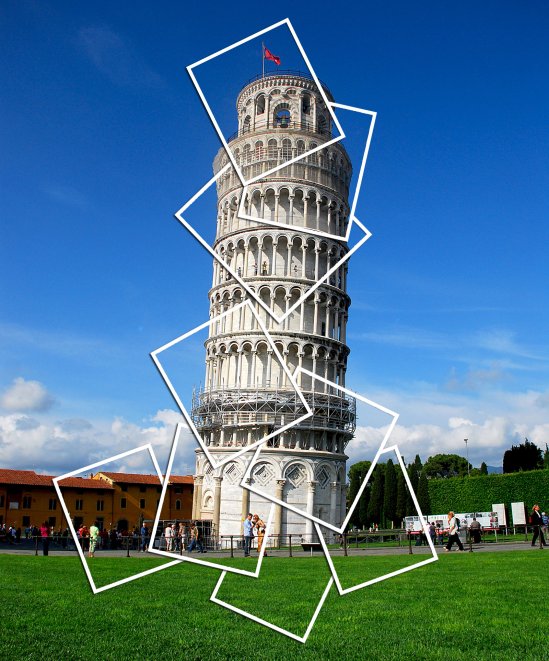
The final image appears to be a combination of many smaller photos.

NOTE : ALL CREDITS FOR THE ORIGINAL TUTORIAL MAKER :)
=================================
=== For more tutorials keep visiting ;) ===
= http://photoshop-manic.blogspot.com =
=================================
Adobe Photoshop Training - Photoshop Classes -
Photoshop Tutorial - Photoshop Seminars -
Photoshop CS3 - Photoshop CS4 - Photoshop 7 -
Photoshop Tutorial Downloads - Lots more :-)
No comments:
Post a Comment