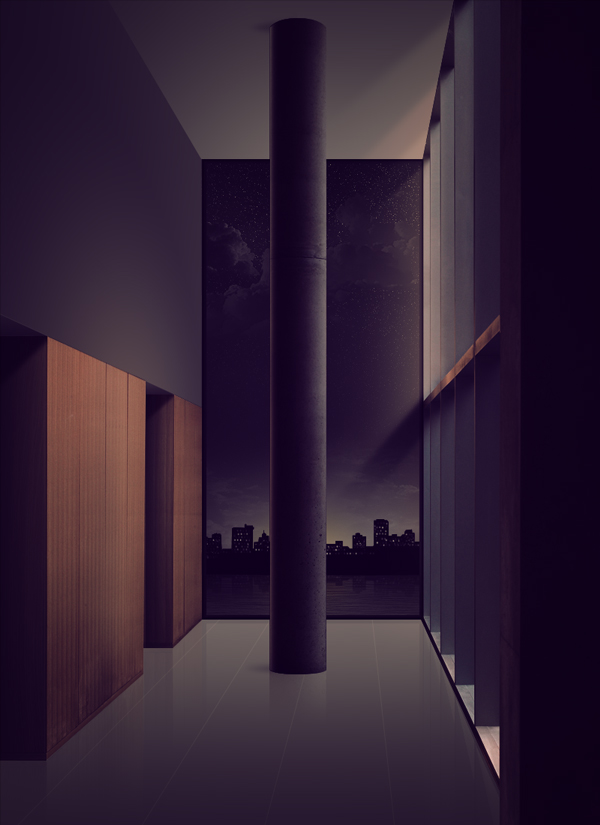
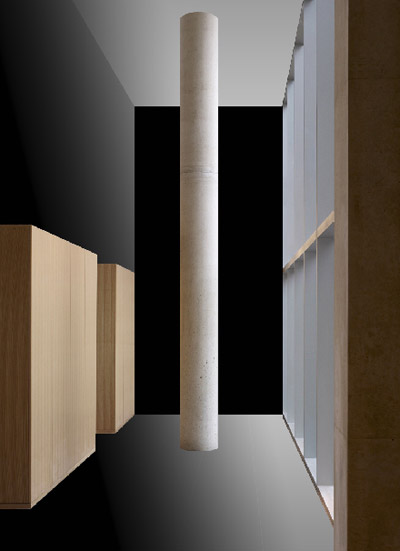
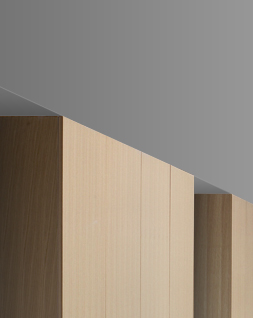
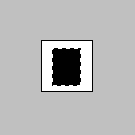
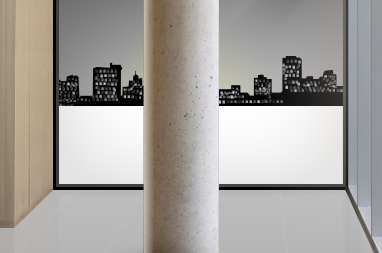
Final Image Preview
This is what we'll be creating.
Step 1
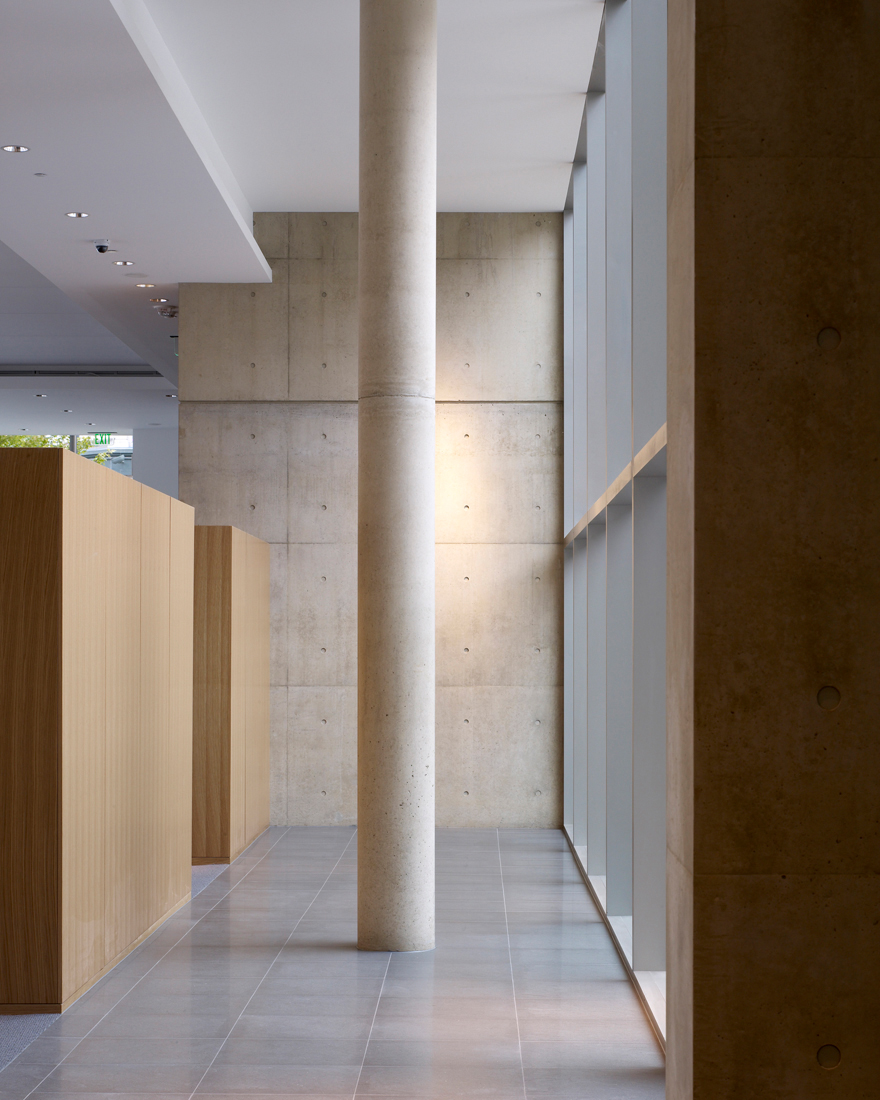
We start off by searching for a photograph of a nice and clean room. It's easier to work with is a room with space between the objects, not too many light sources (for preference only one), clear and clean, and a good high-resolution image. I'm going to use an image
From this article at the Arch Daily Blog. I picked this image. If you're sure about your image and you think you could do something interesting with it, go for it!
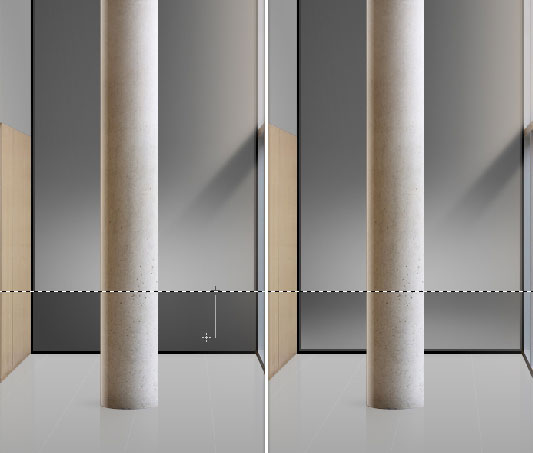
Go to Photoshop and open your image. Directly crop the parts away you don't like or parts you don't think are interesting enough. You can also do this at the end of all the photo-manipulation work, but most of the time you will immediately see which parts aren't interesting. We use the Crop Tool (C) and simply click and drag the part you want to keep.

Step 2
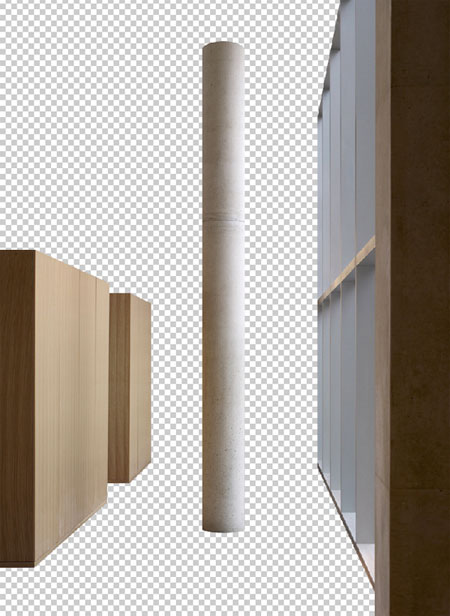
We'll now cut out each object we want to keep. In this picture, I want to keep the wooden closets, the pillar, the windows, and the small part of wall in front of the windows. So you Duplicate (Command + J) the image 4 times. We've got 4 layers extra and the original background layer. Put a vector mask on each layer, except the first background layer. Do this by pressing the Mask Icon twice in the Layers Palette.
Get your Pen Tool (P) and cut each of the objects out on their own separate layers. If you're not familiar with the Pen Tool, here is one for your bookmarks Photoshop Path's Made Easy. Practice with the Pen Tool. It isn't easy in the beginning, but when you've figured it all out, it's a tool that does wonders. Back to the where I was, turn the visibility of the background image off for a while by pressing the Eye Icon in front of the layer in the layers palette.
Step 3
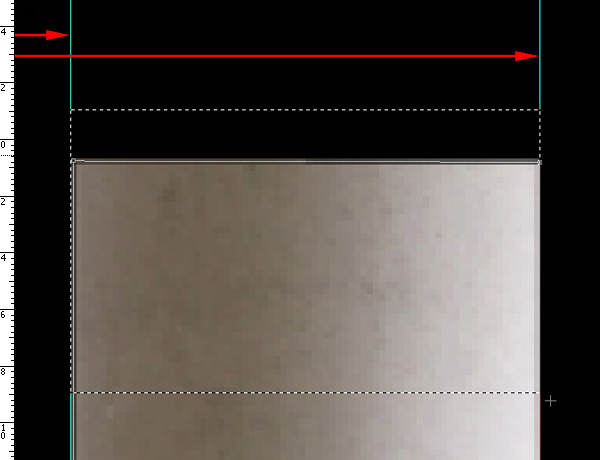
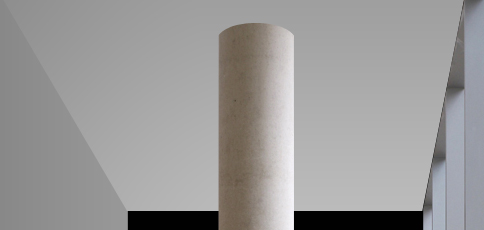
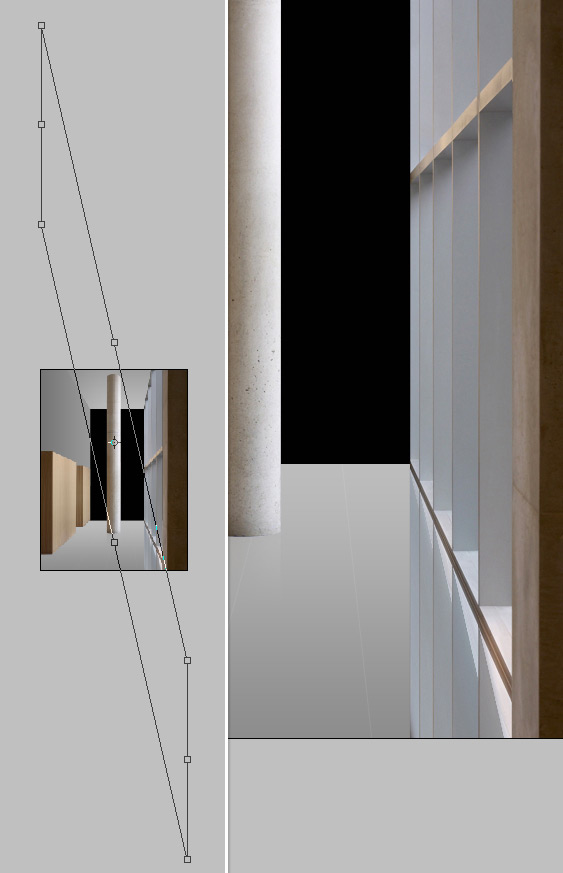
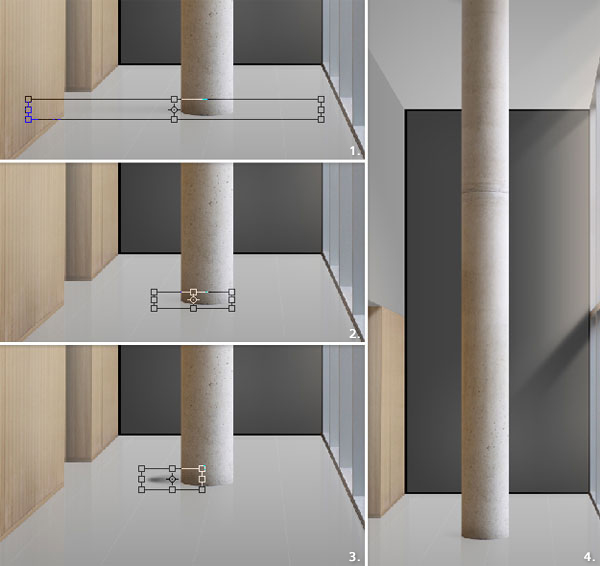
I didn't cut out whole of the pillar. I want it to be on the whole image. So I rounded it up by placing an anchor in the middle of the pillars' Vector Mask, pushed it up, and used the Convert Point Tool to make it round.
You can find the middle of the pillar by creating Vertical Guides on both sides of the pillar. Turn your Rulers on (Command + R) and drag a guide from the left ruler to one side of the pillar. Then drag another one for the other side. Now take the Rectangle Marquee Tool (M) and simply click and drag from the first to the second guide.
I made the background black to make it all a little more clear.
Step 4
Right-click the selection and Transform it. Put your Reference Point Location on the left and after that your width on 50%.
Step 5
You can now see the middle of the pillar by dragging another vertical guide from the ruler to your right side of the selection. This is what I did afterwards to make the top of the pillar round as I explained before.
Step 6
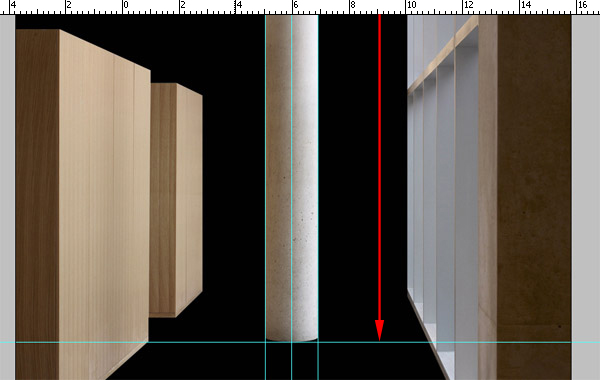
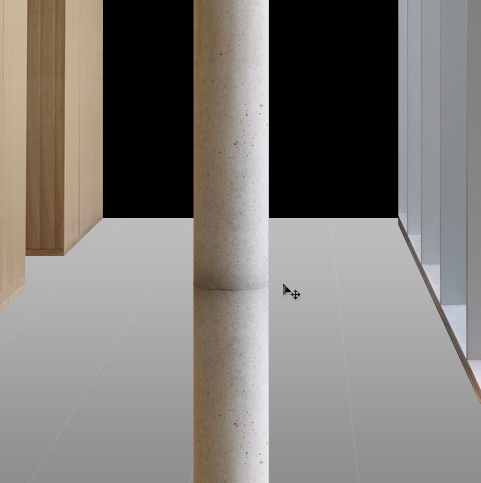
I didn't like the place of the pillar; I wanted it to be more in line with the end of the first closet. So I created another guide, but this time a horizontal one. Same way as a vertical guide, but this time you start dragging by the top bar of the ruler. After that I moved the pillar up, while holding Shift to make sure I drag straight, and it will directly snap to the guide itself.
Step 7
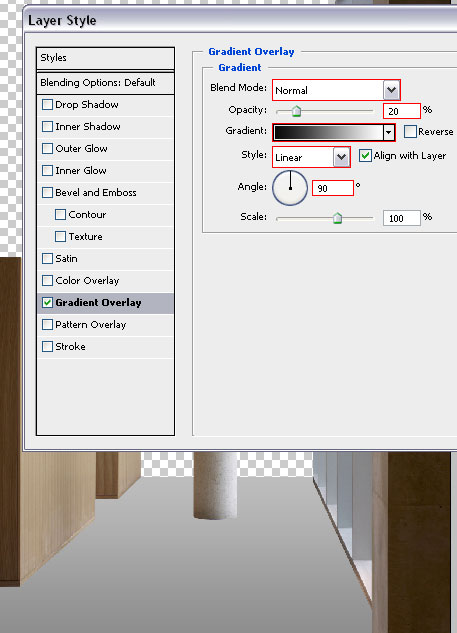
Let's create our floor, go to the first layer and get your Rectangle Tool (U). Simply create a light grey rectangle where the floor used to be. Do make sure your layer is underneath the rest of the four object layers. Open up the Blending Options of the shape layer. Then go to the option Gradient Overlay and set the Blend Mode on Normal, Opacity on 20%, and use a black to white linear gradient, set at 90°.
Step 8
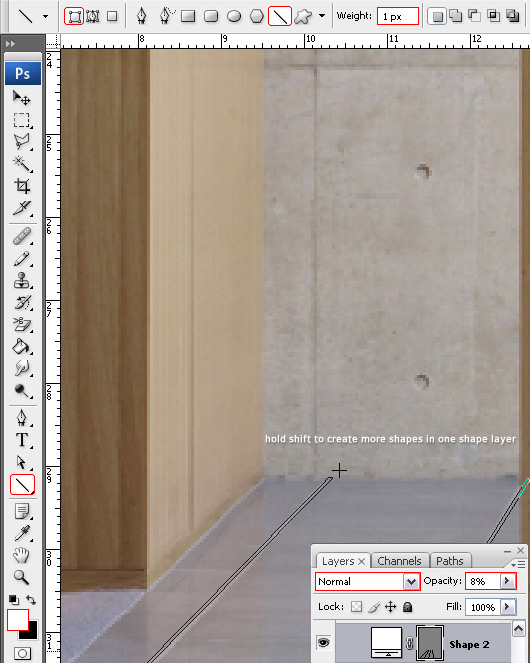
We're going to create some tiles for the floor as seen in the original image. I'm going to put off the visibility of my floor shape now and set the original background layer to visible. Pick up your Line Tool, found in the same set as the Rectangle Tool, and simply make 1 pixel lines over the original lines of the floor in a white color. Put that shape layer on 8%. Note: hold shift for creating more lines in one shape layer.
Step 9
Turn the visibility of the floor back on. We'll create a wall using the same method as the floor. Pick a darker grey color to create a wall. Use the Rectangle Tool again and make the wall stop at the end of the closets. And now we'll do our Gradient Overlay settings a little different, as shown below.
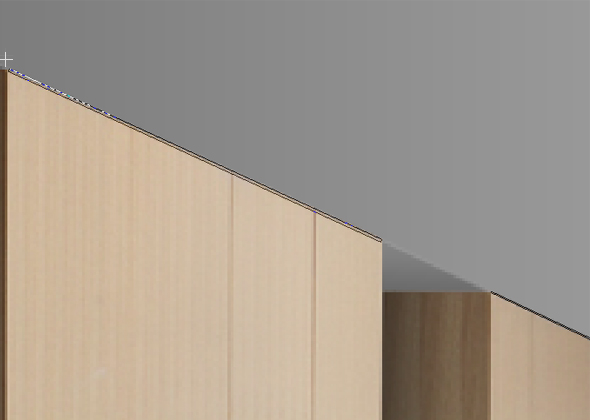
Step 10
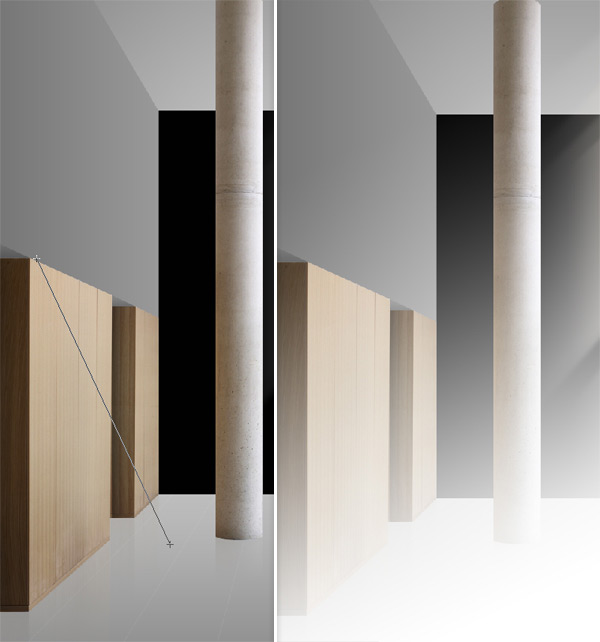
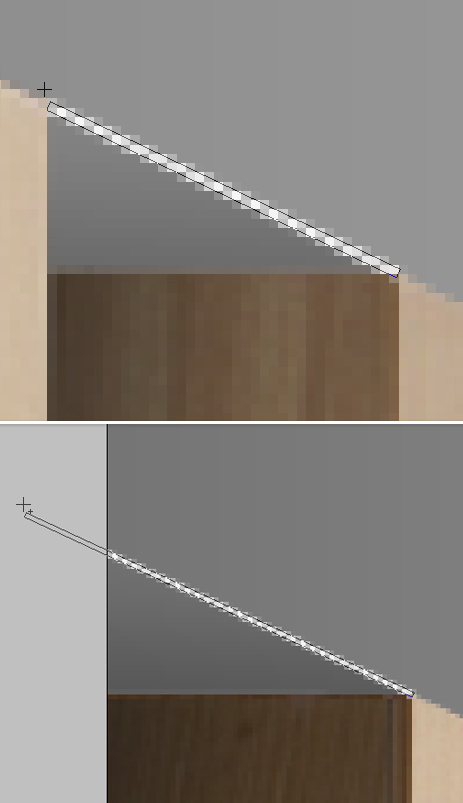
Now watch out for the ceiling, we'll be using the Pen Tool for doing this, but first we need to know where exactly our vanishing point is. This way we know how we've got to draw the ceiling. We have to change the ceilings perspective, since we created the wall. You can do this on feeling or create lines as guides. Follow with a line underneath the closets and the right windows to know where the vanishing point is.
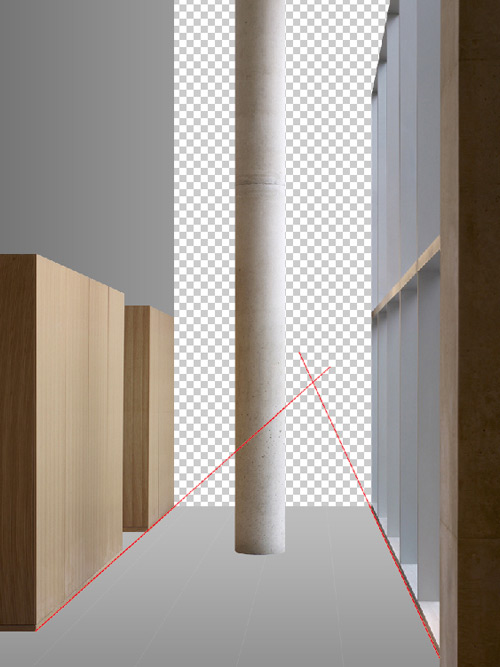
Step 11
Pick another color and begin a third line out from where the first two lines cut each other, which is the vanishing point.
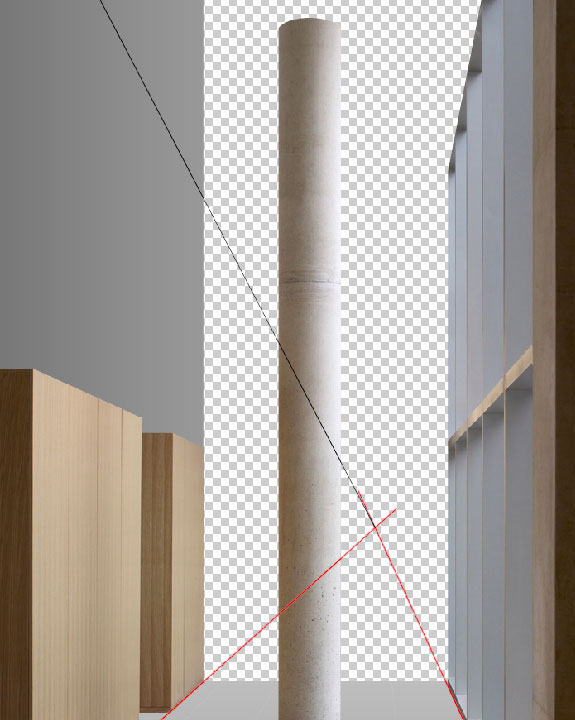
Step 12
Use the Pen Tool with a light grey color, and follow the guide line you just made. Also, use the Gradient Overlay settings as shown below. Then you can delete the lines we made as guides for the perspective. You can also delete the original background layer, as we'll not be using that anymore.
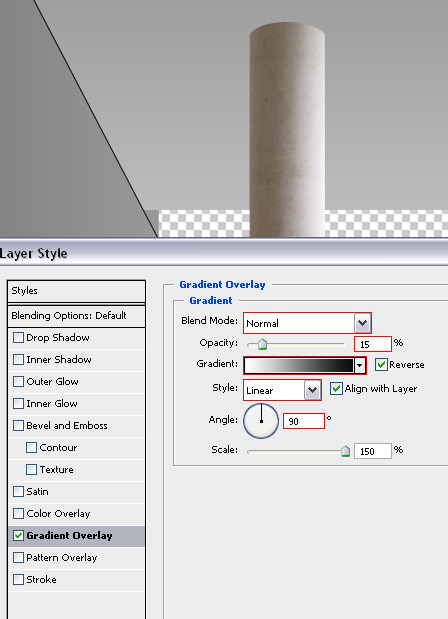
Step 13
There's light coming from the right, so at the left the ceiling has to be a bit darker. Make a gradient that's slightly rotated on top of the ceiling.
Step 14
Copy the mask of the ceiling shape layer by holding Alt and dragging it to the gradient layer. Then set the Opacity at around 20%. I did this to creating a realistic light effect.
Step 15
I wanted to have a shiny floor. I thought that making reflections for every object was a good idea, but watch out, as you have to mind the perspective so they still look realistic. You can't just flip them vertically and give them a gradient mask. Some objects need to be skewed first.
We'll start with the easiest one first, the "pillar" layer. Here we can just duplicate the layer, flip it vertically, and give it a gradient mask. Duplicate "pillar" layer. Then Free Transform (Command + T), right-click, and Flip it Vertical. After that, move it underneath the "pillar" layer.
Step 16
Add a Layer Mask and pick your Gradient Tool (G). Create a black to transparent Gradient by clicking and dragging from a little above the bottom of the document to the middle of it. Put that layer on 40% opacity.
Step 17
The "windows" aren't as easy to create as the "pillar." You also duplicate the layer and flip the layer vertically. The difference is that, when you bring it down, it isn't in the right perspective. So we right-click and press Skew, while in Free Transform. You've got to zoom out a lot now. Holding Alt and scrolling up and down with the mouse scroll makes it easy to zoom.
If you go over the right or left side of the image now, an icon will appear. Click and drag with your mouse up or down to skew more or less.
Step 18
Now add a layer mask and once again a black to transparent gradient, but this time diagonally. Then set the opacity at 40%.
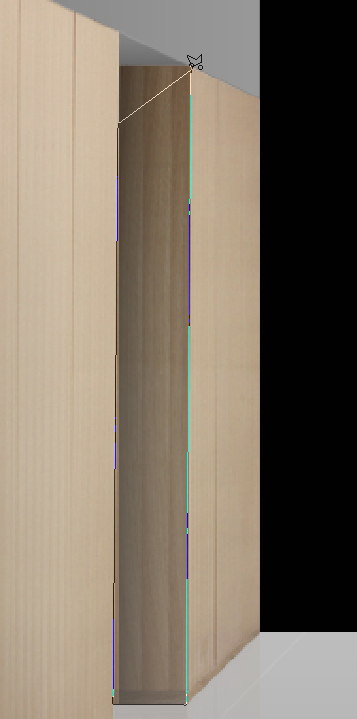
Step 19
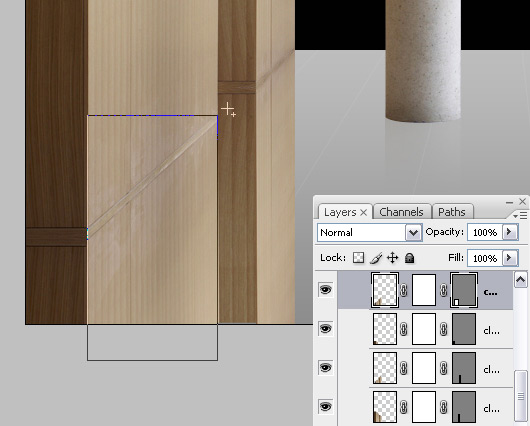
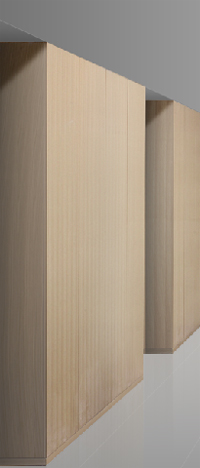
The "closets" are the most difficult to create. We Duplicate the original "closet" layer, right-click on the Vector Mask, and then press Rasterize Vector Mask. The Vector Mask becomes a Layer Mask, but we want our "closet" to be cut out to be easier to work with. So we right click the Layer Mask and hit Apply Layer Mask. The object is cut out, without masks, and rasterized right now. Give it a Layer Mask and a Vector Mask once again. Duplicate this layer three times, so you have Four rasterized "closet" layers.
Okay, leave the masks alone for a while now. Maybe you're asking yourself why I made four rasterized "closet" layers. Well each side of the closets must have another masking and perspective. The two sides we're looking straight on are easy and can just be flipped vertically. But the sides pointing to the windows have to be flipped and skewed. You'll get something similar to the image below once you've done that.
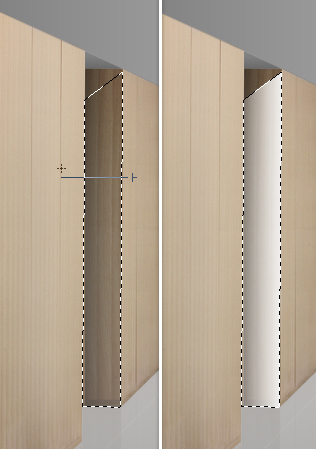
Step 20
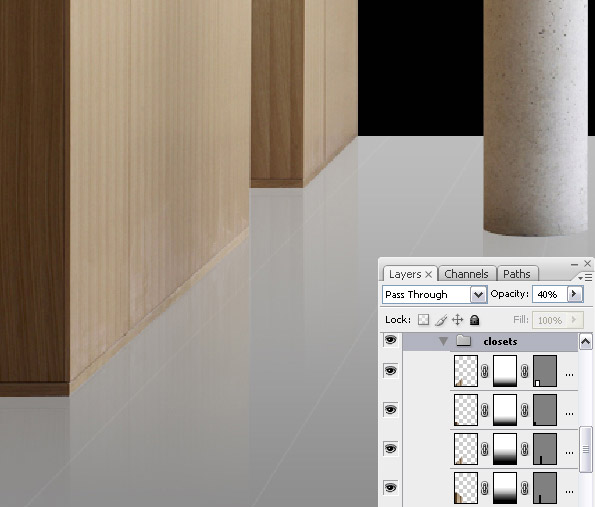
This is the time where we'll be using the Vector Masks. Pick your Rectangle Tool and create a shape for every side of the closets.
Step 21
Now add black to transparent gradients once again to every Layer Mask. Put these four layers in a group and set the Opacity of that group to 40%. Then place that group under the original "closet" layer.
Step 22
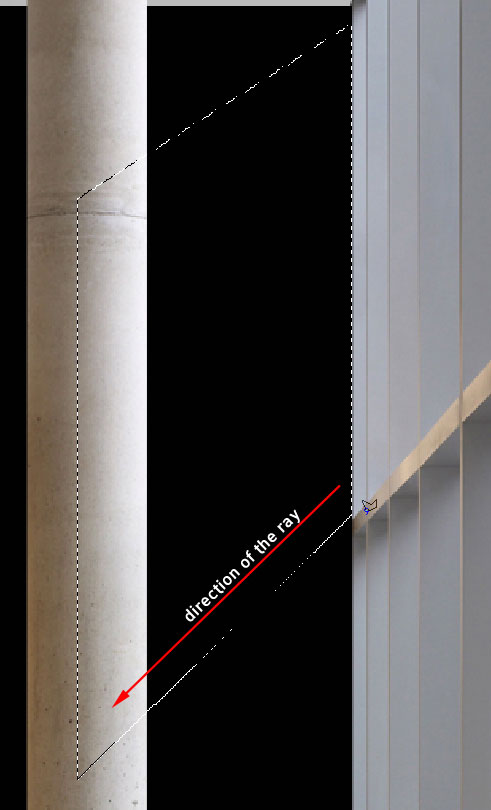
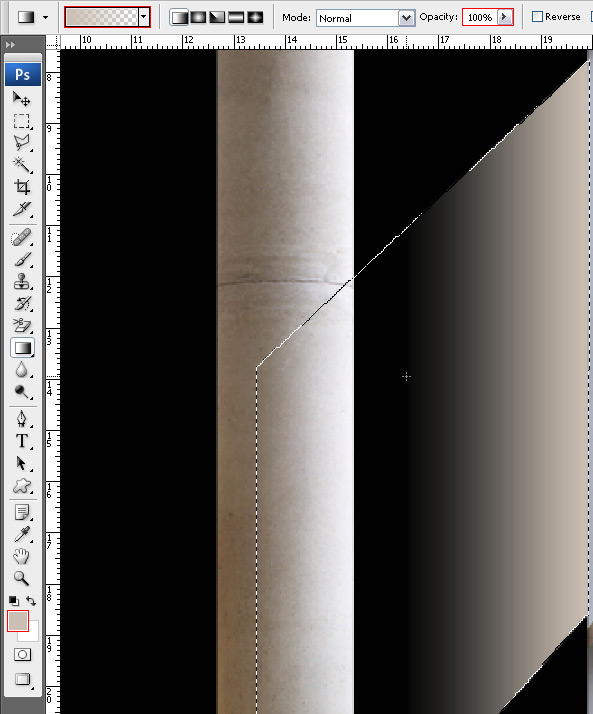
We are going to add some light rays, which will come out of the windows on the right. This will not only give the image a more dramatic look, but also more realism. Notice the light is coming from the right. Create a new layer and pick the Polygon Lasso Tool (L). Make your first selection at the hindmost window, as shown below.
Step 23
Choose a beige color and create a gradient using the Gradient Tool.
Step 24
Go to Filter > Blur > Gaussian Blur and apply about a 2 pixel blur. Then set the Opacity of the layer at 30%.
Step 25
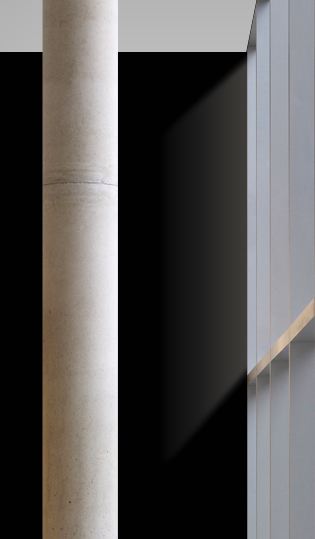
Let's make rays coming out of all the upper windows as well. Duplicate that layer. Scale it up with the Free Transform Tool (Command + T). Then move it until you touch the sides of the second window, as shown below.

Step 26
Continue doing this until you got as many rays as there are windows on top, which you can see. I finished up with four rays on top. I set the last three on an Opacity of 20% instead of 30%.
Step 27
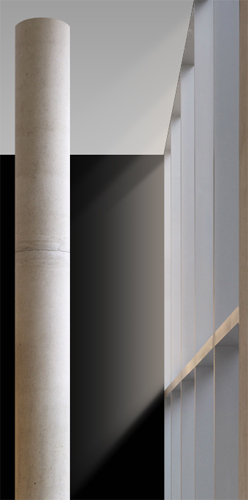
To make it more realistic, create a smaller ray on the bottom rows of windows. I only created one at the back, but as it's the top row you could fill all the windows with rays. Make sure to mask the bottom rays with a black gradient coming up.
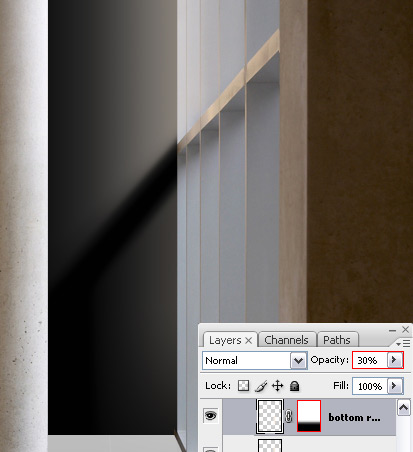
Step 28
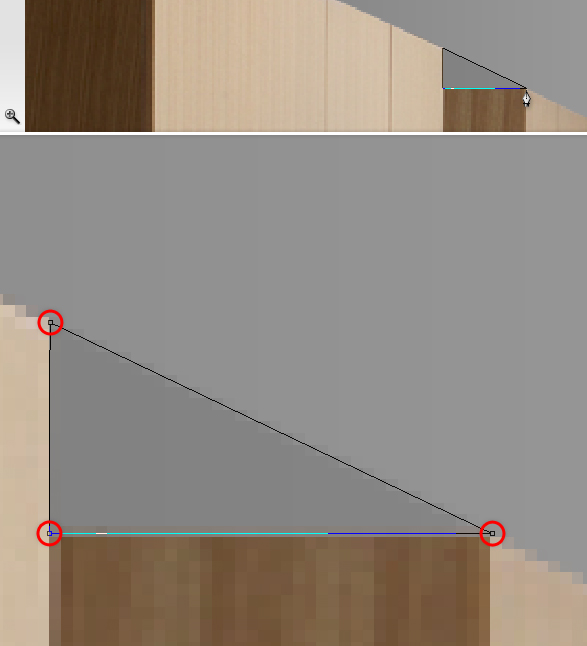
Something I like to do is to pick an object of the image and change its purpose. For example, here we can make the wooden closets into separate wooden walls that have doorways. Easy job, but keep in mind that it has to stay realistic. We take our Pen Tool and make a black triangle that will be the ceiling of the doorway. The upper line must be in line with the two closets. Then set it on 30% Opacity.
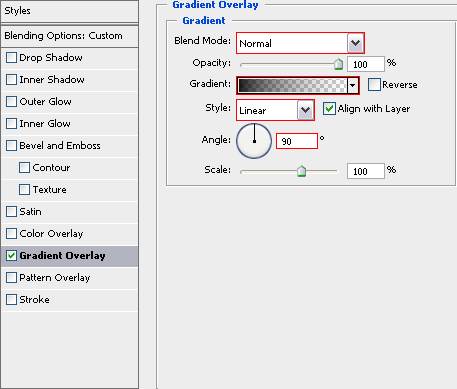
Step 29
Give it a black to transparent gradient and the following Gradient Overlay settings.
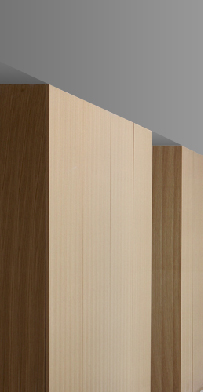
Step 30
Do the same for the closet in front.
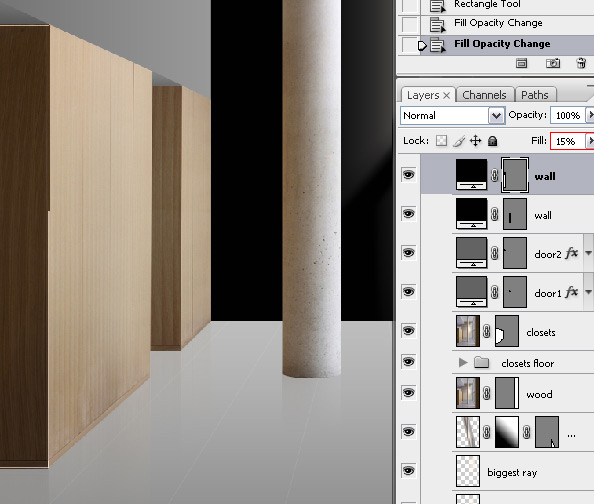
Step 31
We'll make some changes in the closets. Pick the Rectangle Tool and create two rectangles (in separate layers) on the walls of the doorways. Then set their Fill Opacity at 15%.
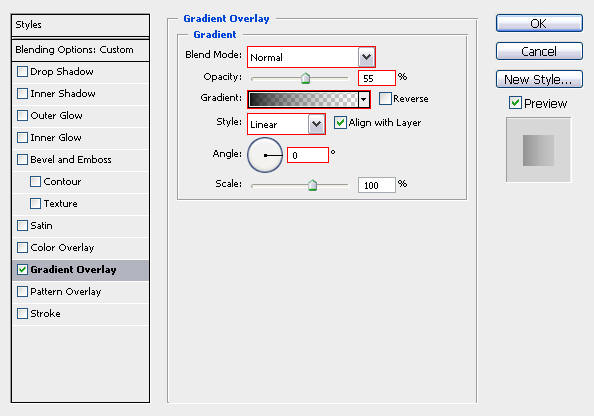
Step 32
Give both shape layers a horizontal black to transparent gradient of around 55% Opacity.
Step 33
Create a new layer and pick the Gradient Tool. Use a white to transparent linear gradient. Then create a diagonal gradient starting somewhere away from the right lower corner of the wall and ending a little above the top of the wall.
Step 34
Select the walls surface, by holding Command and clicking the shape layers image. Invert your selection by pressing Command + Shift + I. Then press Delete to clear outside the rest of the wall. Then Deselect by pressing Command + D. Do this on both walls and set their Opacity on 50%.

Step 35
The doors, as in reality, need some highlighting at their corners. Create two 1 pixel lines by using the Line Tool with white set as the color. Simply follow the corner of each doorway with your Line Tool, hold Shift while creating the second line. Press F on your keyboard to get more space out of your document.
Note: hold the Spacebar down and use your left mouse button so you can easily drag your document around. You can also press the H Key for the Hand Tool, but using the Spacebar is way easier and faster.
Step 36
Now put that shape layer on 15% Opacity.
Step 37
Do the same thing now, but this time on top of the closets with a black color. Then set the Opacity at 15%.
Step 38
The ceilings of the doorways have to create a shadow because light is coming from the right. The technique is almost the same as creating the rays. You use the Lasso Tool and select the walls surface, except a small triangle in the left upper corner. Keep in mind, the unselected part will become the shadow.
Step 39
Pick the Gradient Tool and create a linear white to transparent gradient going from the right to the left. Hold down Shift to make sure it's straight.
Step 40
Deselect it and give it a 2 pixel blur with the Gaussian Blur. The white will now come a little out of the walls surface. So select the walls surface, you can simply select the rectangle shape layer we made earlier. Then add a Layer Mask, the blur will now only be in the wall. It has to be darker when you go downward the wall, so we also put a black to transparent gradient on the layer mask. Then set the Opacity at around 70% of that layer.
Step 41
Do the same thing for the other wall.
Step 42
We'll be making a window for a look at the sea and the city. We'll be making this window behind all the layers we've created so far. Go to your first layer, that now will be the floor shape layer. Then grab your Rectangle Tool and make a rectangle in the place where there's currently nothing. It doesn't matter which color.
Step 43
Now this is all about the Blending Options. First of all put your Fill Opacity on 0% and give the layer a grey 6 pixels inside stroke.
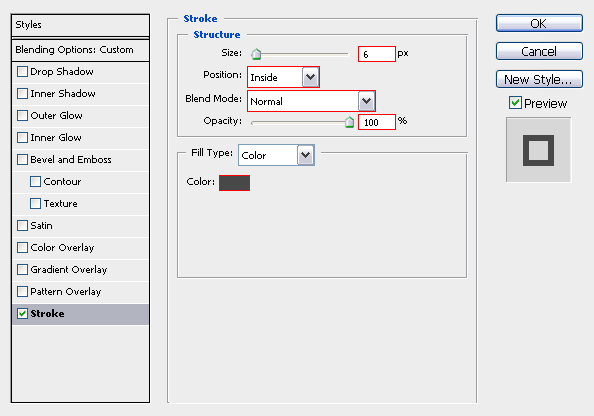
Step 44
Duplicate this layer. Change the Blending Options of the Stroke, Inner Glow, and the Gradient Overlay. Make a black 3 pixel inside stroke. For the Inner Glow, set a Normal black 100 pixel sized 10% Opacity Glow.
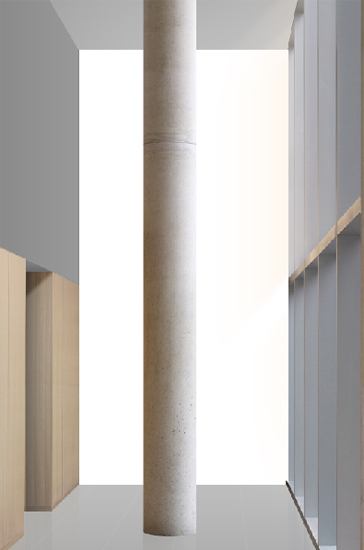
The Gradient Overlay is something else; we're going for a radial white to light grey gradient that will position somewhere behind the pillar for another light source coming from the city. We'll be making this later on. Put the Blend Mode on Overlay, the Opacity on 25% and the scaling on 55% You'll end up with something like the last image in the series below.
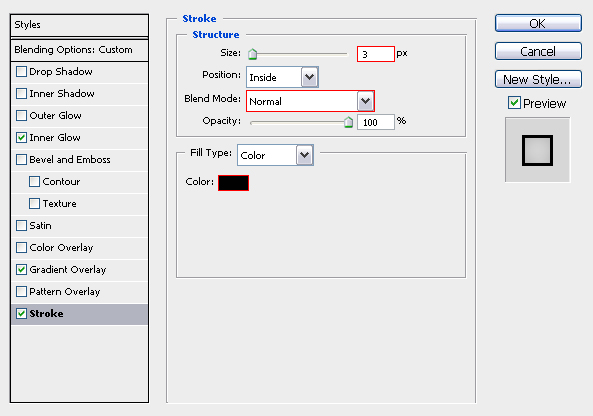
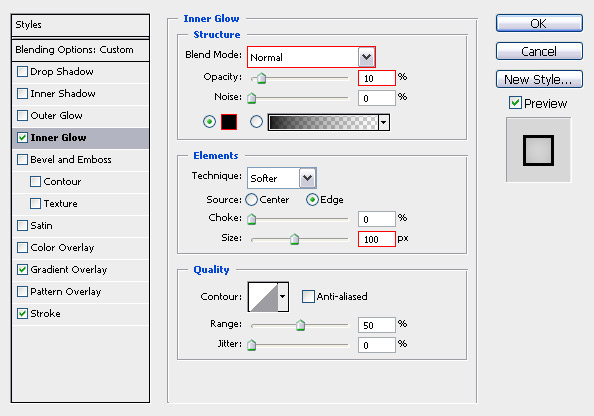
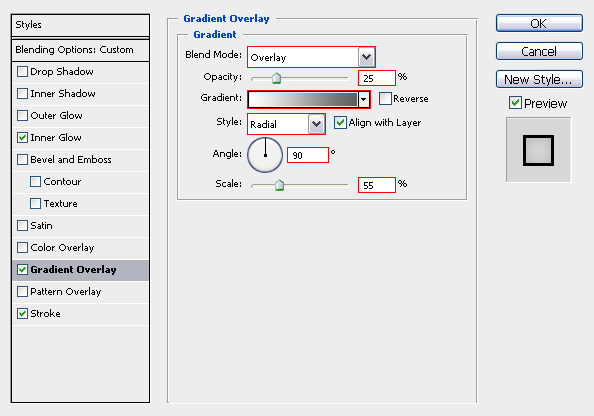
I made the background dark grey to make it a little more clear.
Step 45
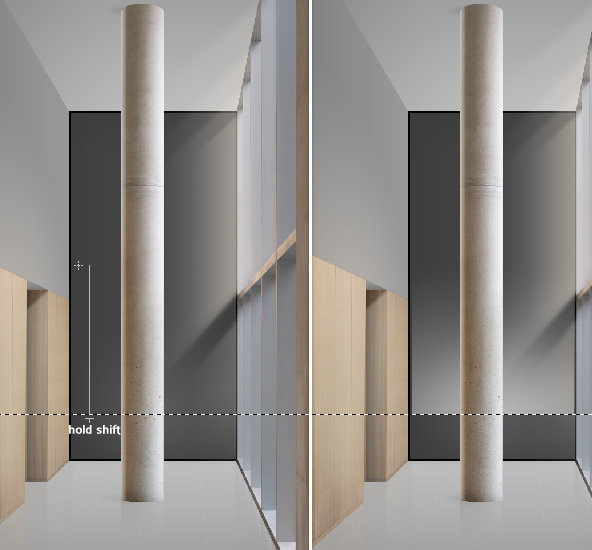
Let's give this a reflection on the floor too. Duplicate both "window" layers and place them in a group. Then move the group underneath the "window," add a Layer Mask, and give it a black gradient coming from beneath. Then set the Opacity of the group at around 30%. Make sure the group is above the "floor" layer!
Let's add some more light on the left wall. Also, shadows and backlight for the pillar. Create a new layer on top of the "left wall" layer. Somewhere in the middle of the document, take a very light rose color and make a radial gradient with the Gradient Tool, but make sure the whole gradient is in the document.
Step 46
Free Transform the gradient and put it above the wooden walls. Hold Command while clicking the upper corners of the transform to change their places. This is the same as a Distort Transform (Edit > Transform > Distort).
Step 47
Then set the opacity of that layer at something around 30%.
For the shadows of the pillar you do practically the same thing as the light we did before. Only now use black radial gradients.
- Create a big radial gradient covering the whole of the area. Give it Layer Mask with a black gradient coming from the left with the layer on an Opacity of around 8%.
- Create a smaller one with an Opacity also around 8%.
- Then create a very small one on 100%, also with a layer mask with a black gradient coming from the left to make it fade out.
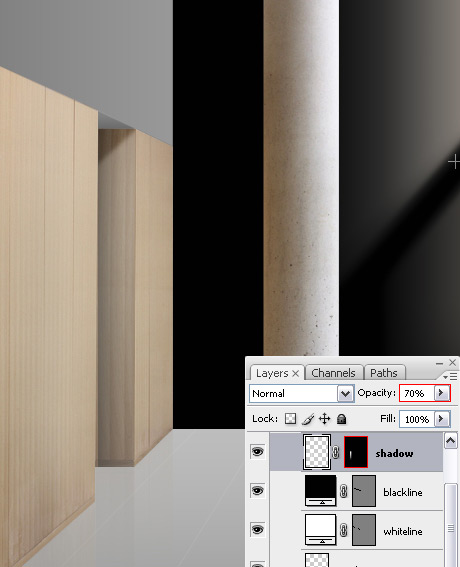
- Put them in a group and set the Opacity on something around 90%. If there's a little black coming out where you don't want it to be, add a layer mask. Then select it and delete it. I do this on both the top side and bottom side of the pillar.
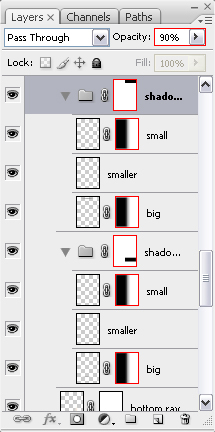
Step 48
You're Layer Palette should look something like the image below so far.
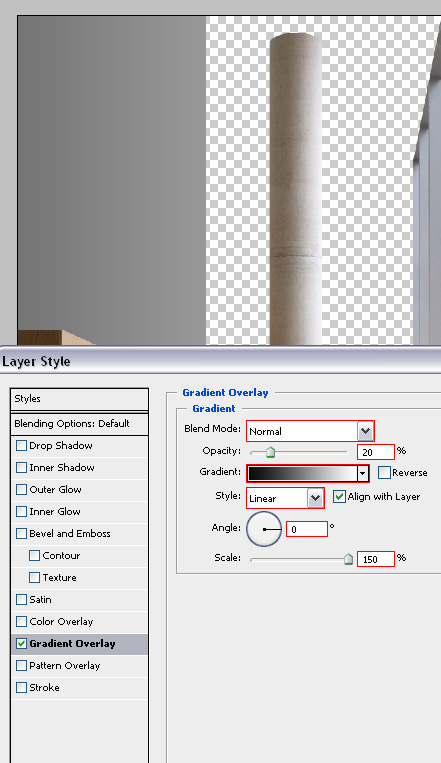
Step 49
Let's create the backlight for the pillar. Go to the "pillar" layer and create a thin rectangle shape on the left side of the pillar, doesn't matter which color.
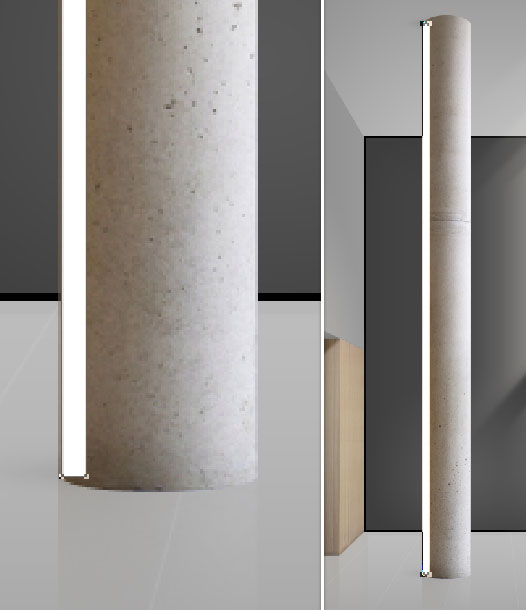
Step 50
Drag the right anchor point up, where the "pillar" stops. Add an anchor point in the middle and drag that one up too.
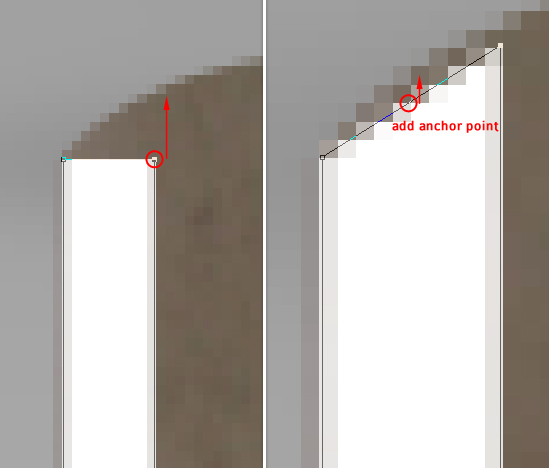
Step 51
Do the same thing for the anchor points at the bottom of the pillar, but now pull the anchor points downwards.
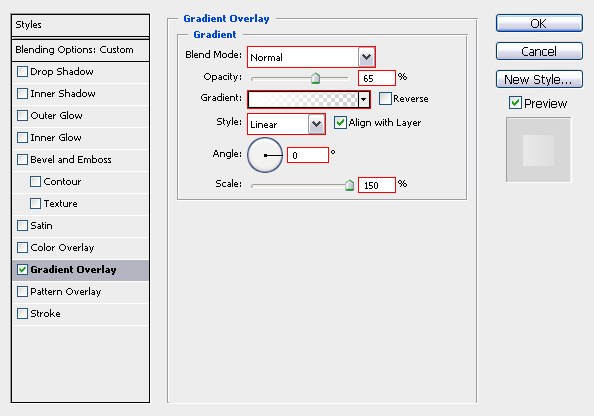
Step 52
The only thing you've got to do now is change the Blending Options. Set the Fill Opacity at 0% and give the Gradient Overlay a white to transparent gradient set at 65% Opacity. Change the Angle of the gradient to 0° and the Scale to 150%.
Step 53
Now that all the adjustments of the room are done, we need something that's behind the window. I'll go for a nice design of a city at night. First, let's select all the layers we created until now. Go to the first layer, which will be the "floor" layer, and press on it.
Then go all the way up to the last layer, which will be the "shadow" layer for the closet, and hold Shift while clicking on it so that you select all layers of the room. Group them all. I simply name it "Room." I name my layers to make easier for editing later on. I want to be able to find things quickly.
Next we need our background. Create a new layer, behind the "Room" group of course. Select a rectangle with the Rectangular Marquee Tool (M), which will be our sky.

Step 54
Take the Gradient Tool and add a gradient going from light to dark grey going up vertically.
Step 55
Inverse that selection (Command + Shift + I). Then add a gradient going from grey to light grey down vertically. This will be our sea.
Step 56
We need a light coming from somewhere. Create a new layer, pick the Gradient Tool and add a yellow to transparent radial gradient somewhere behind the pillar, as shown below. Then place the Blend Mode of the layer on Overlay and set the Opacity at 25%.

Step 57
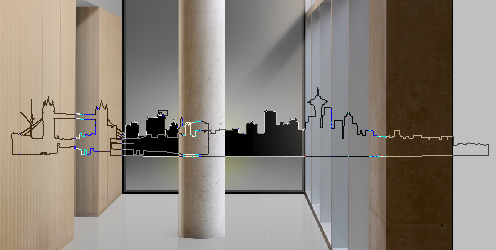
We're going to create our city skyline. You can do this by yourself by tracing a photo of a city skyline with the Pen Tool. Another option is to search for some custom shapes on the internet. On DeviantART I found these custom shapes called Skyline Collection by hebedesign. Install the collection an use one of the shapes shown below.
I keep monuments and such out of the image, because I think that's a bit silly to put in your background.
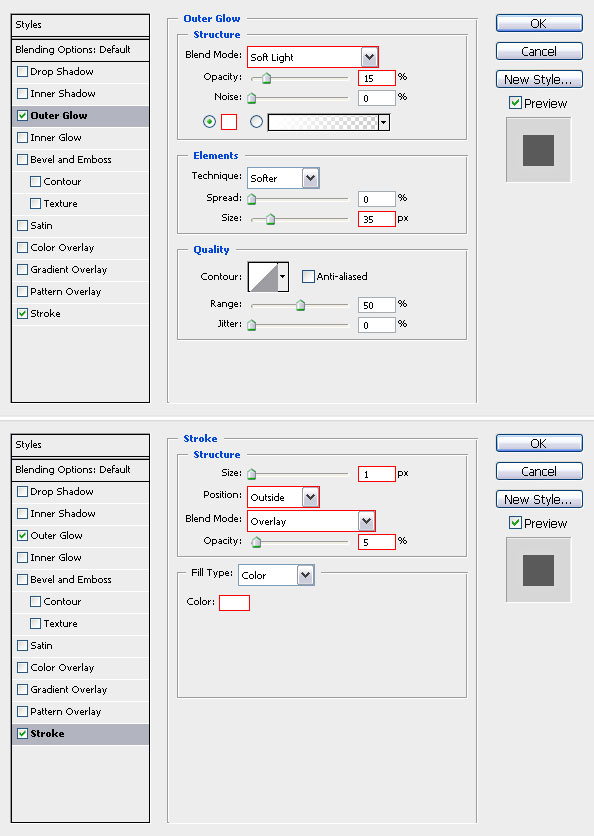
Step 58
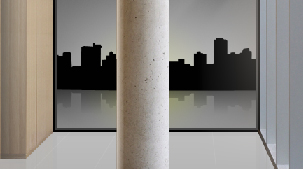
Now set a Layer Style of Outer Glow with a white Soft Light Blend mode, so that there's light coming out of the city. As an optional Blending Option you can give it a white Stroke with a very low Opacity and on Overlay to make it a little sharper.
Step 59
Give the city a reflection on the water. Same as the floor reflections, we duplicate the layer, flip it vertical, and add a Layer Mask with a black to white gradient.
Step 60
I want to have lights come out of the windows of the buildings so that there's obviously life in the city.
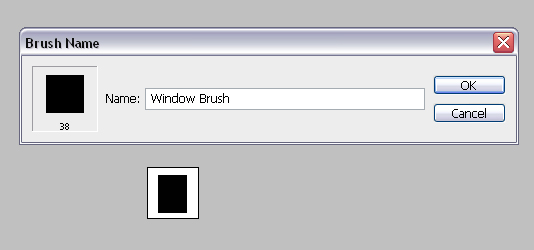
Let's make it ourselves easily by creating a window brush! Make a new document with 50 pixels by 50 pixels. Select a rectangle with Rectangular Marque Tool somewhere in the middle. Fill it with black using the Paint Bucket Tool (G).
Step 61
Deselect and go to Edit > Define Brush Preset, and name the brush whatever you want.
Step 62
Select your newest brush and go to Window > Brushes. Then apply the following settings, just a few things to change to make perfect windows.
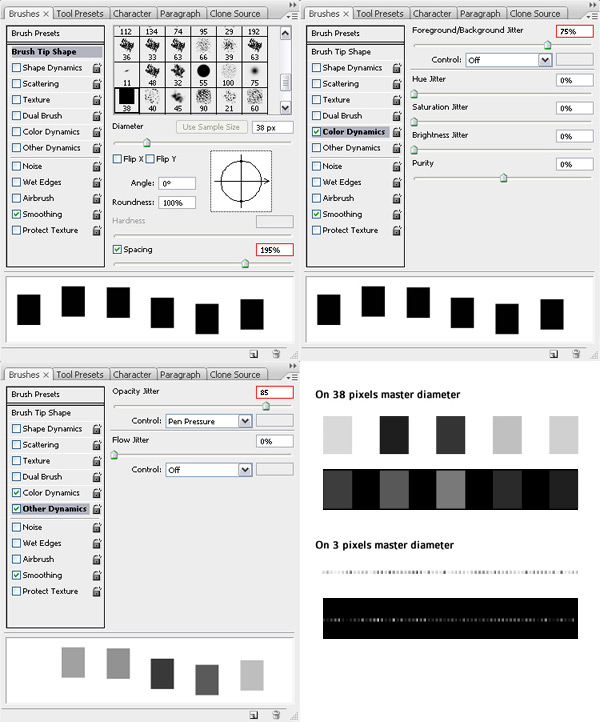
Step 63
There you have it, perfect windows to paint with. Brushing in straight lines will give the best result, hold Shift while clicking. Once you're done, give them a reflection on the water too.
Step 64
Let's create the sea next. Create a new layer. Make a selection where you plan the sea to be and fill it with white.
Step 65
Go to Filter > Noise > Add Noise. Use an amount of above 100% with Gaussian and Monochromatic set.

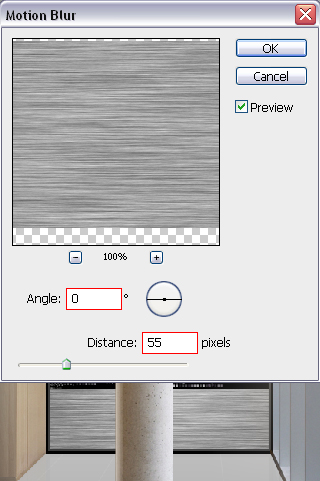
Step 66
Now go to Blur > Motion Blur and set an 0° Angle with a Distance of around 55 pixels.
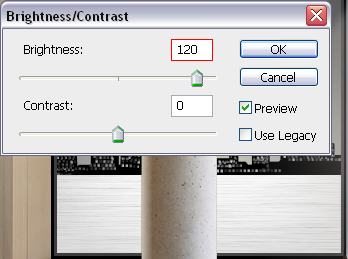
Step 67
Change the Brightness by going to Image > Adjustments > Brightness/Contrast, and set the Brightness to around 120.
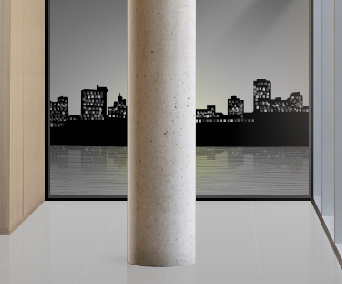
Step 68
Put the Blend Mode on Multiply and Duplicate that layer once.
Step 69
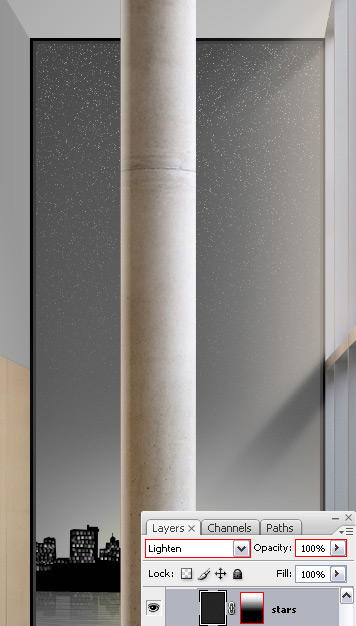
Now fill the sky with some stars and clouds. The stars are made by creating a new layer and making it entirely black. After that go to Filter > Noise > Add Noise, and pick an amount of around 25%.

Step 70
Put the Blend Mode on Lighten and add a Layer Mask filled with a white to black gradient going down.
Step 71
You can also add more stars with brushes, there are lots of those brushes to be found on deviantART, Space and Star Brushes. I made clouds with brushes I found on deviantART too, Cloud Brushes.
I made three layers. Two layers set at 60% Opacity for the clouds high in the air and one layer with 30% Opacity for the clouds closer to the ground. If you want to brush away some parts of the clouds, then add some Layer Masks.
Now go back to the "star" layer and add a Vector Mask. Then grab your Pen Tool and cut away the clouds, so there's no cloud filled with stars. Select all the layers you made underneath the "room" group and put them into a group too.

Step 72
Well it doesn't really look like a night scene yet. All we need are some adjustments to the colors, the contrast, and a bit more to fix that. This step is important though very easy to do. Adjustment Layers are not only awesome in photography, but you can use this in digital illustration as well.
You'll find the button to create new Adjustment and Fill Layers to the left of the Group Button in the Layers Palette. We'll be using Black and White, Brightness/Contrast, Curves, Hue/Saturation, Solid Color, and Gradient Adjustment Layers.
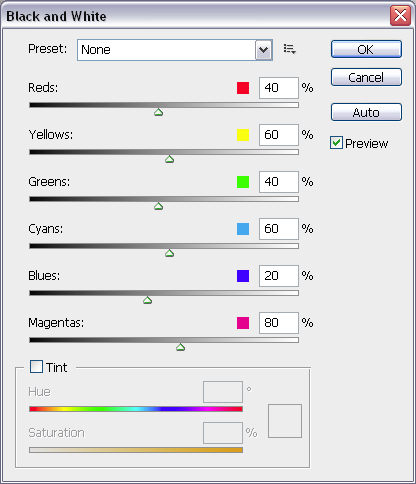
Make sure you're making layers above the "room" group. Go to Black and White and leave the settings as they are. Click OK and put the Blend Mode on Multiply and the Opacity at 80%.
Step 73
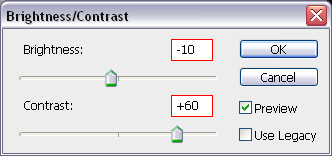
Go to Brightness/Contrast and change the Brightness to -10 and the Contrast to +60. Leave the Blend Mode and Opacity on default.
Step 74
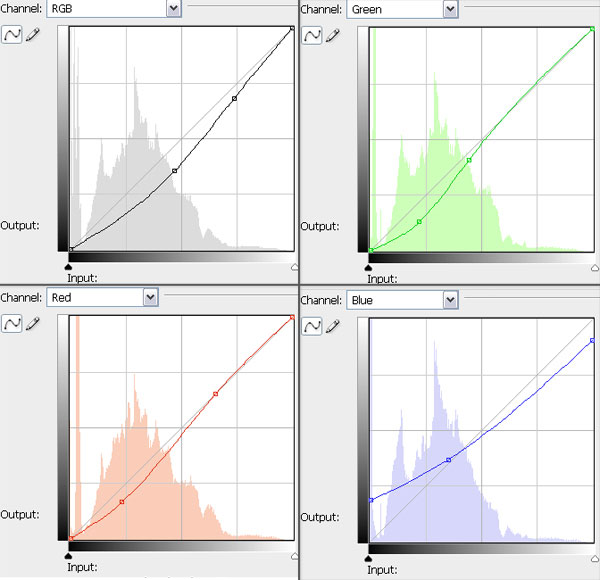
You can play with the Curves. Again, I left the Blend Mode on Normal and the Opacity on 100%.
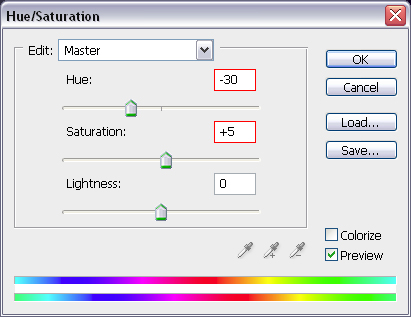
Step 75
Change the Hue/Saturation, I putted the Hue on -30 and moved the Saturation up a little. Then I changed the Blend Mode to Darken and the Opacity to 25%.
Step 76
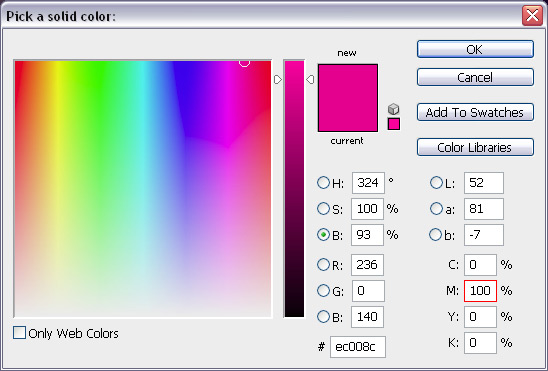
Then I added a solid color, picked Magenta, and set the Blend Mode on Hard Light and the Opacity on 7%.
Step 77
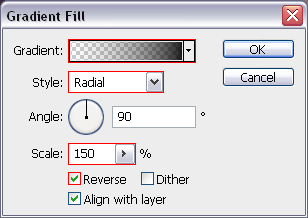
Next add a Gradient Fill to make a sort of vignette. Use a radial black to transparent reversed gradient, 150% scaled. Also, set the Blend Mode on Overlay with 30% for the Opacity.
Step 78
The gradients may be a bit choppy now. Well that's because you're probably working on an 8 Bits/Channel. You can go to Image > Mode > 16 Bits/Channel. Be aware that you now will not be able to save in JPEG format anymore, but only in PNG and some other higher quality formats. If you don't want choppy gradients, go for 16 Bits!
Step 79
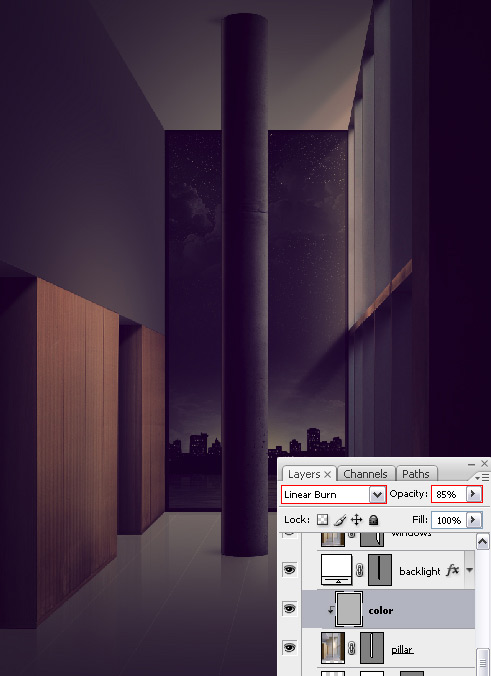
I'm not a fan of that pillar; it's too bright in comparison with the rest of the image. So I go back to the "pillar" layer, and create a new layer on top of it. Fill the layer with a light grey and put the Blend Mode on Linear Burn with the Opacity at 85%. Now right-click on the layer in the Layers Palette, and press Create Clipping Mask.
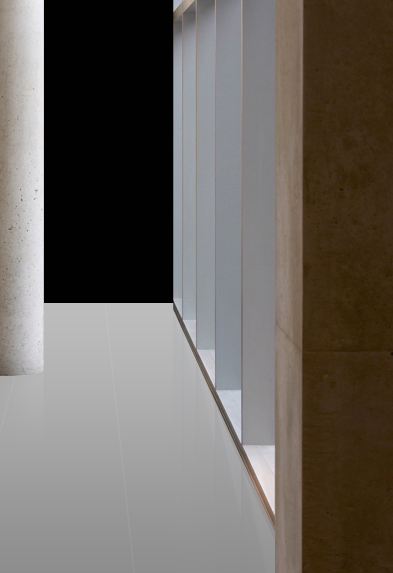
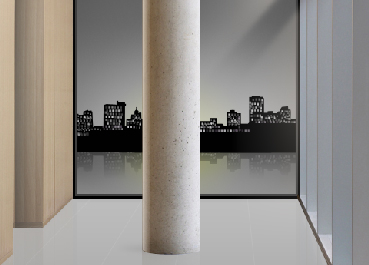
Final Image
We're finished! We learned how to use objects within an image and how to create something entirely new with them. We used the right perspective and created realistic lighting effects. We learned how to create a city skyline at night with a sea in front. Then we added in some finishing touches with Adjustment Layers to create a more dramatic and realistic final effect.
No comments:
Post a Comment