Step 1
Open Photoshop and click Ctrl+N to start a new image. Change the dimensions to 1200px by 1200px, and change background color to Black. Unlock the background layer of "Layer 0."
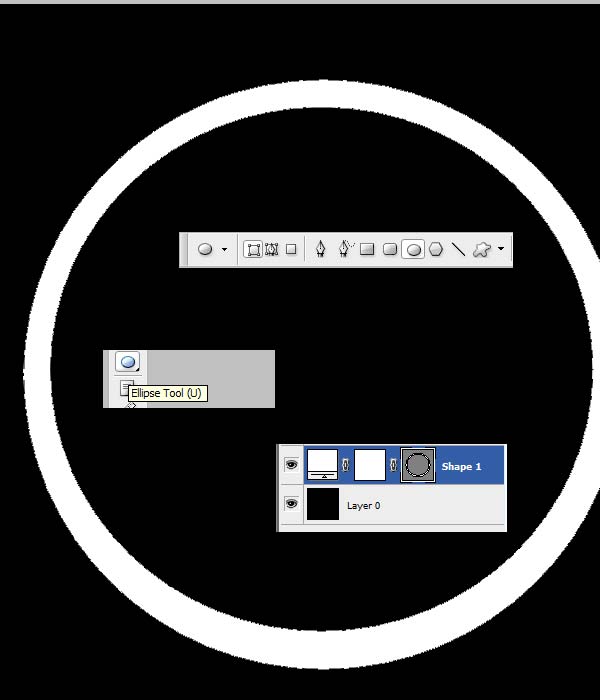
Step 2
Press Ctrl+' to make the Grid visible. Then select the Ellipse tool (U/ Shift+U). Choose Shape Layers in the Tool Options. Then while pressing Alt+Shift (constrained proportion), drag a circle. Drag another circle in the same way, and set it to subtract from the original to make it a ring. Don't make the ring too thick.
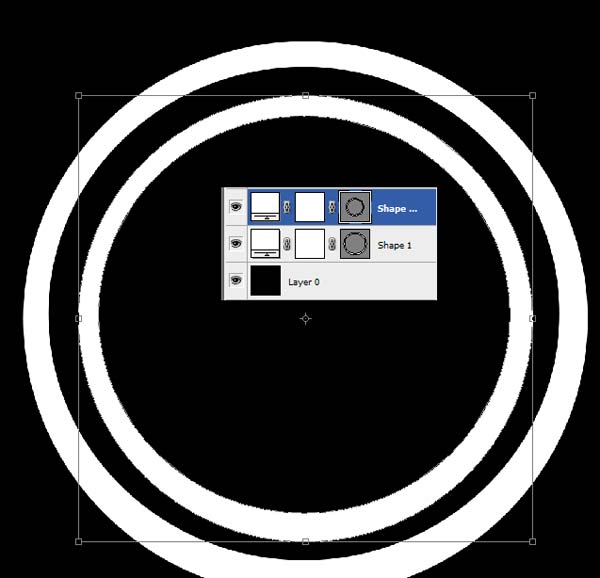
Step 3
Duplicate the layer by pressing Ctrl+J. Then Resize it by clicking Edit> Transform> Scale. Make sure you keep Alt+Shift pressed while transforming.
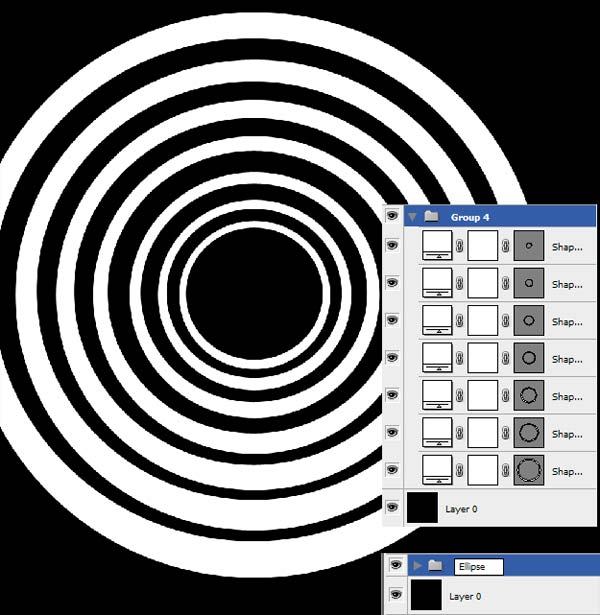
Step 4
Continue this process of resizing by making several concentric rings - each in a new layer. Once you reach something similar to the image below, add all the "Ring layers" into a Group. Then rename it as "Ellipse."
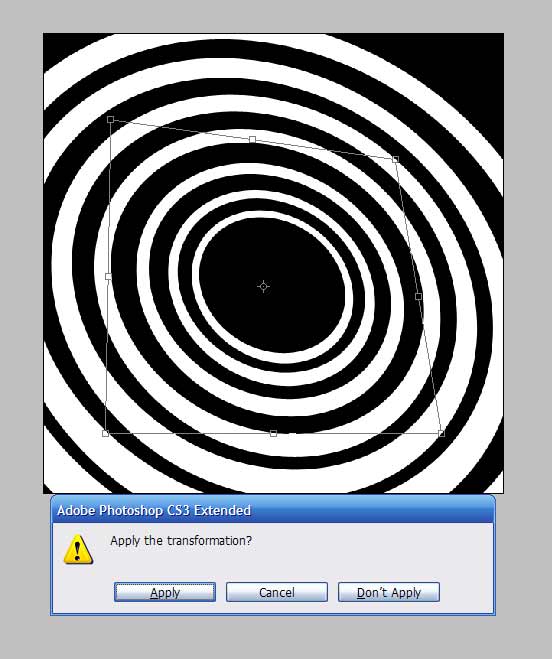
Step 5
Now apply perspective transform to the Ellipse layer by Ctrl+ Clicking on the control points. Make it anyway you feel like. When done click the Move tool (V). Then select Apply on the confirmation when asked.
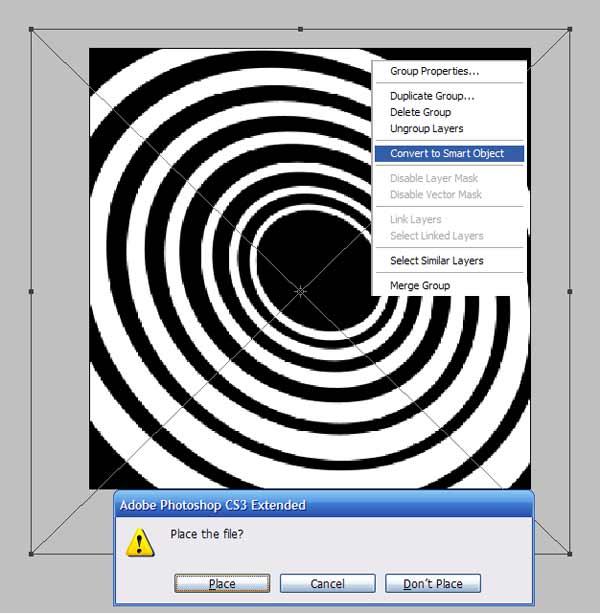
Step 6
Convert the "Ellipse" group into a Smart object so that we can scale it to a size larger than our canvas. This is needed for the current task. Again confirm the scale by pressing Place. Smart Objects are parametric
and can be edited without loss of quality.
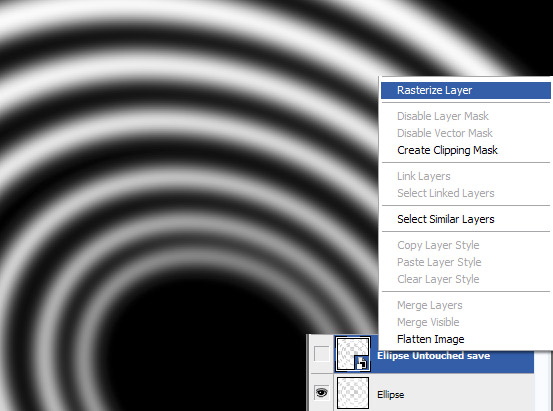
Step 7
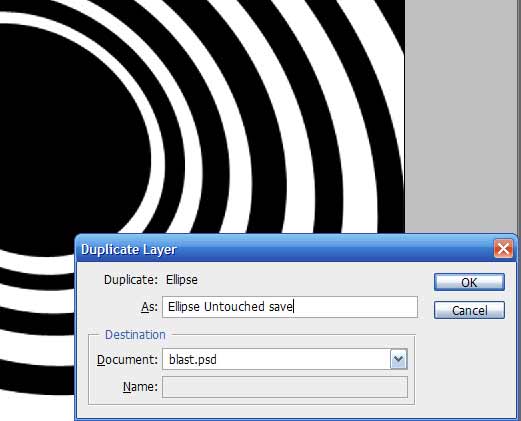
Now copy this layer by clicking Duplicate Layer in the layers panel, rename this copy to "Ellipse Untouched save." Then move this below the background "Layer 0." This is to preserve the layer for later use.
Step 8
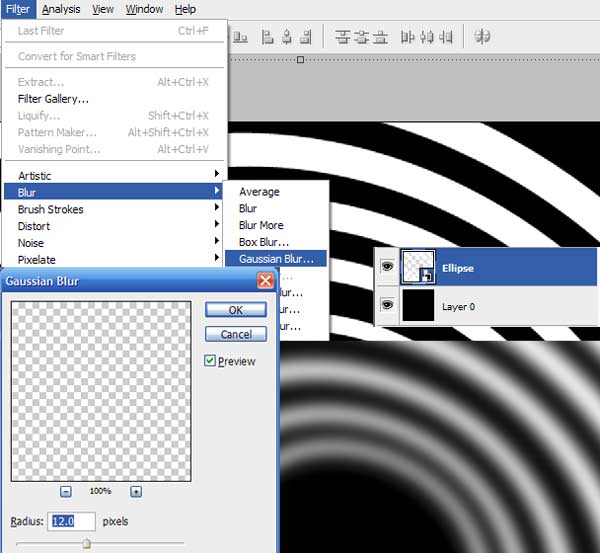
Now apply a Gaussian Blur to the Smart layer "Ellipse." Keep the blur Radius to something around 10-13 px. This blurred layer will be used as a Visual/Thermal distortion around the blast.
Step 9
Make a duplicate of "Ellipse untouched" and Rasterize it along with layer "Ellipse." We no longer need them editable. Raster is made up of pixels rather than parametric curves. Any extreme transformations (scaling/skewing etc.) at
this stage may cause the pixels to bleed.
Step 10
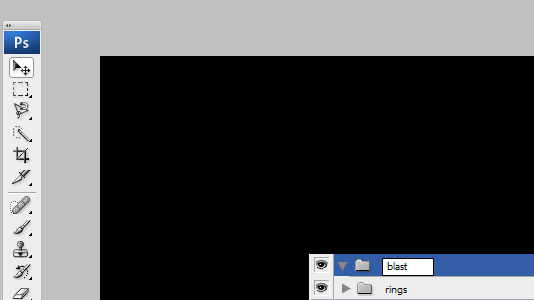
Put both these Raster layers into a Group, and name it "rings." Then create another new group, and rename it "blast." The group "rings" will hold the obvious, whereas the "blast" will form the backbone of the explosion. It will be the bottom most layer with color.
Step 11
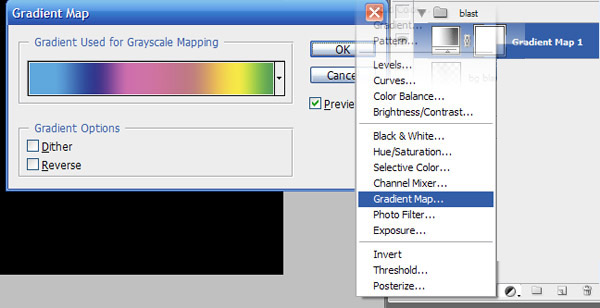
In the "blast layer" add a blank layer "Layer 1." Then add a Gradient Map layer on top. Change the fill of the "Gradient Map layer" to around 50%. Then change the blending mode to Overlay.
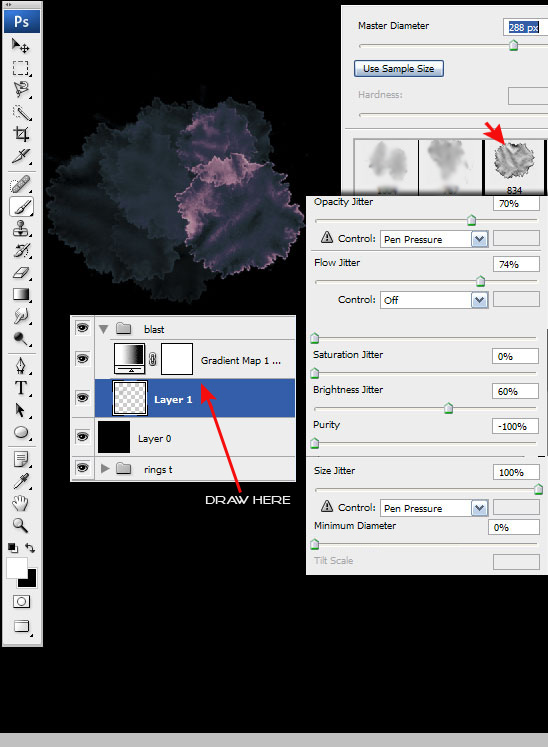
Step 12
Now highlight "Layer 1," and set up your brush as shown below. Draw randomly throughout the canvas, but leave some spots so that the background is visible. The image shows a sample stroke of the brush, as you can see the overlapped portions are distinctively brighter than the rest. Brush in using the coffee strain brush (834). Control of strokes (as in Wacom) is not required, although they are selected.
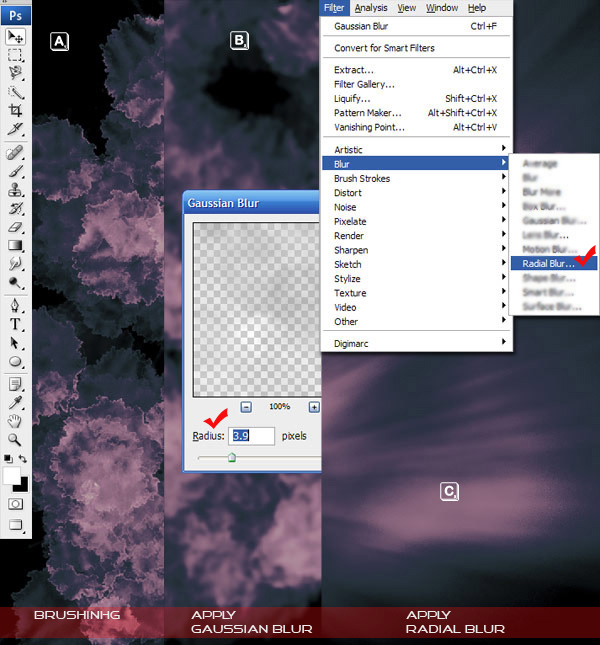
Step 13
The image below shows three successive operations on "Layer 1," which will be later renamed to "bg blast," i.e., background blast as it serves as a master background for all layers above it.
A. After completion of the brush strokes, pay attention to the non-uniformity of the brush. It must be that way to get a detailed blast effect.
B. Apply a Gaussian Blur of around 3-4 px to stage A.
C. Apply a Radial Blur on the result of stage B. The amount is 100, Blur Method is Zoom, the Quality is Good, and Blur Center corresponds to the center of the Ellipse.
Step 14
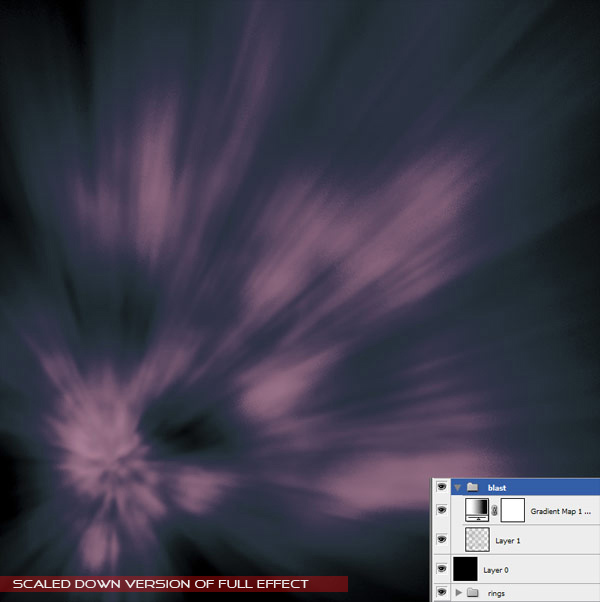
So, this is the effect so far. Notice the "rings layer" stacked below the opaque background has no effect in the current output.
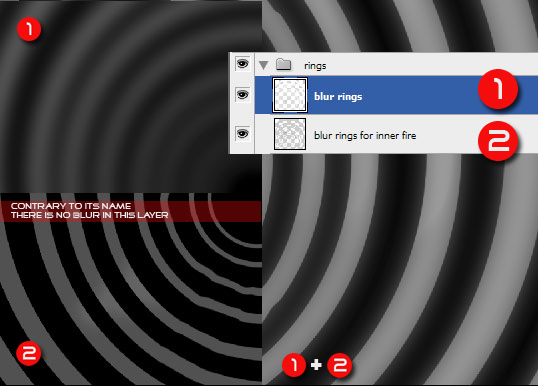
Step 15
Now lets move onto the "rings group." We renamed the blurred layers: "Ellipse" as "blur rings" and "Untouched...save"
as "blur rings for inner fire." The names might sound funny, but they are named for what they will be doing later on (but it's still funny). Change the Opacity of both the layers to around 40% each
and the blending to normal.
Step 16
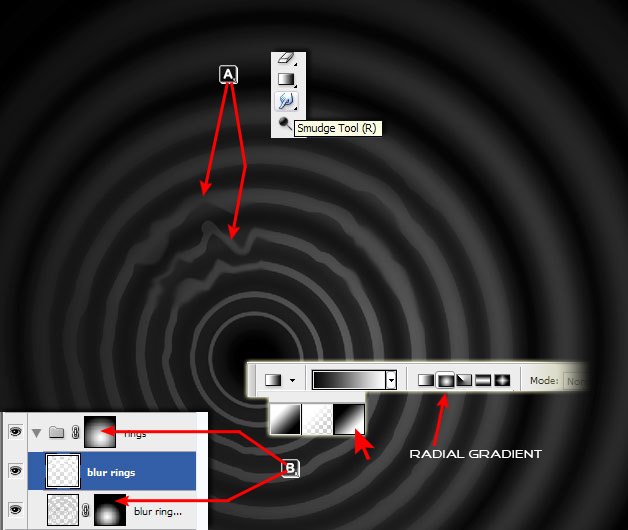
This pic is showing two operations on the "rings group."
A. Use the Smudge tool to distort the sharp rings from the "blur ...inner fire" layer (not highlighted in the img, sorry).
B. Apply two Radial Gradients as layer masks, one on the distorted layer from the previous step, and the other on both the layers as a whole (on the group).
The result of these Masks can be seen in the image below, the thicker the ring the more blurry it gets. This step is carried out to give a sense of depth to the image.
Step 17
You can fine tune the effect of distortion (Smudge) by making the "blast Group layers" visible.

Step 18
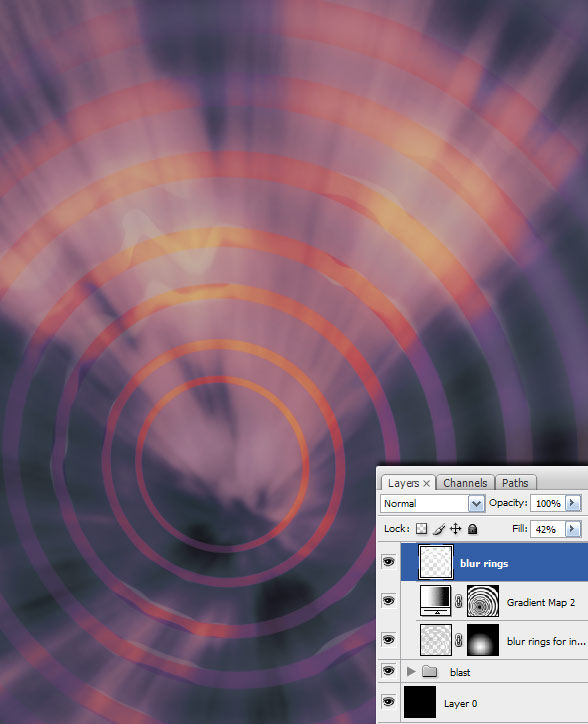
Now apply a Gradient Map, as shown inside the "rings" group. Set the Opacity to 61% and the blending mode to Pin Light. Apply a layer mask to it, which is nothing but merged layers seen in Step 9. This layer mask is added to keep the background black.
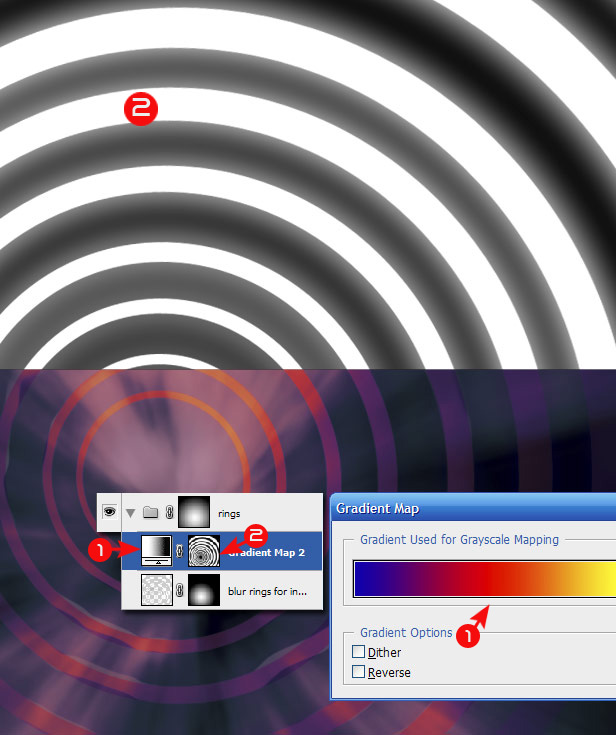
Step 19
Now pull the layer "blur rings" on top of the Gradient Map. This will release that layer from the influence of the Gradient Map.
This step creates something like "Local motion blurs" similar to the ones produced
by a wave motion in a radially oscillating ring.
Step 20
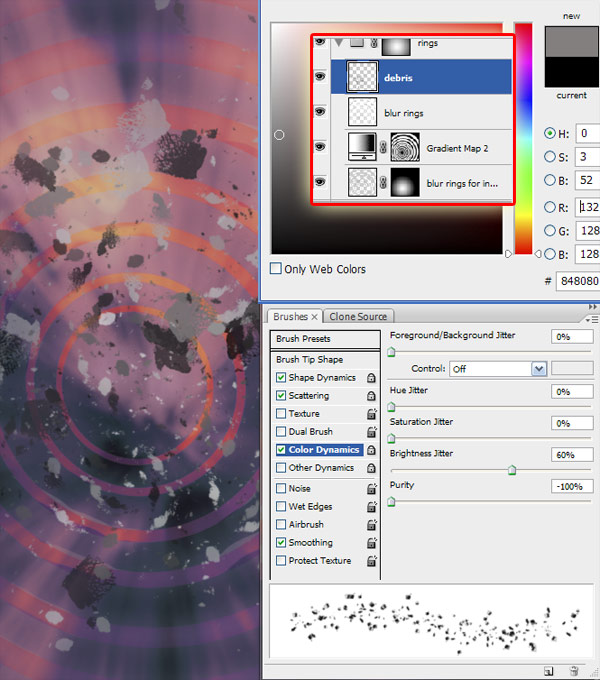
It's time for the debris. Any grunge brush without too much transparency will do. See the variations in the strokes, the result is created with many stokes of varying Sizes and Dynamics.
Use a good Brightness Jitter and a Medium Grey color to simulate non-uniform lighting. This is due to the random orientation of the pieces. Keep in mind that we don't need too much transparency here. You may also leave this layer blank for now, and later return once everything else is complete. This way you can make the most out of this layer.
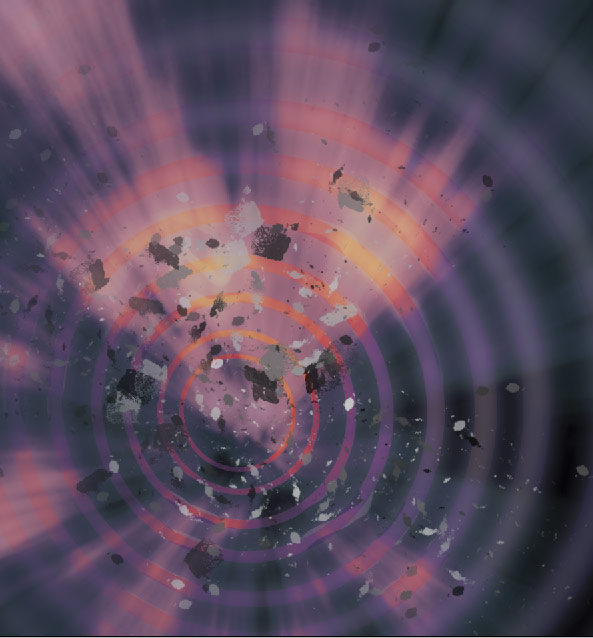
Step 21
The image below shows the effects in this design up to this point. If your results are different from this, don't be upset, instead try adjusting some of the previous steps.
Step 22
Above the "rings" group create another group named "corona smoke." Then create a sub-group called "fire rims." Then create two additional layers under the "corona smoke" group. Name them "smoke soft light" and "corona glow." We will be adding another Gradient Map inside "fire rims," but that's unnecessary right now.

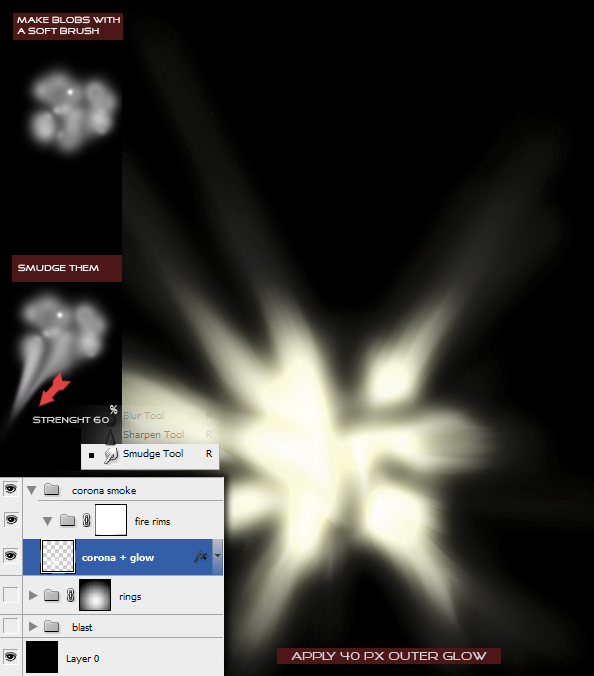
Step 23
The layer "corona + glow" will hold the brightest gases of the blast, as the name suggests. It's pretty simple to create, just draw a few blobs with a soft brush. Then Smudge over it. Work to achieve an effect similar to the image below. Then when you're satisfied with the design, apply an Outer Glow with the following settings: Color of #ffffbe (default), Blending Mode of Linear Dodge (Add), Opacity of 95%, and a Size of 40-60 px.
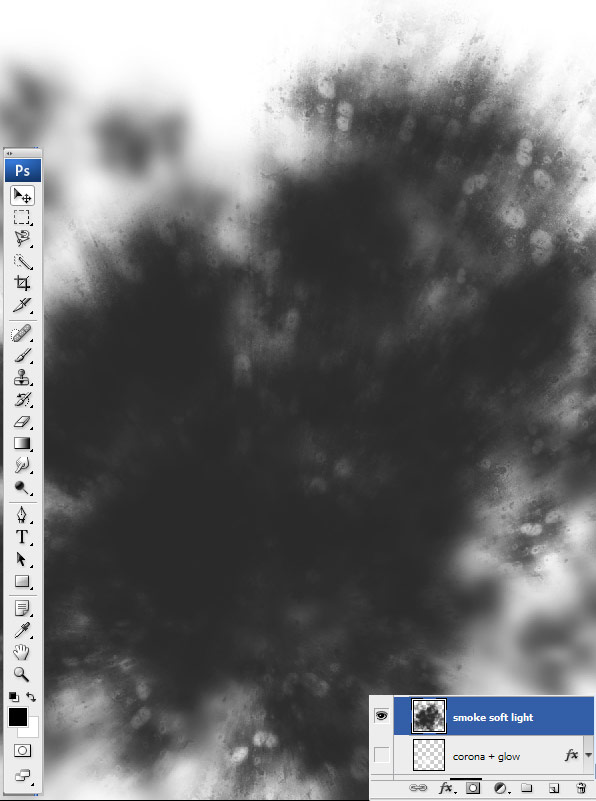
Step 24
I'll explain the basics of creating this smoke and give a rough overview of the workflow. The smoke you can see in this image is made of three layers. One layer with a Gaussian Blur applied, the other with Radial Blur, and one untouched layer. After creating the three layers, collapse them down into one layer. The blending mode for this combined layer is Soft Light.
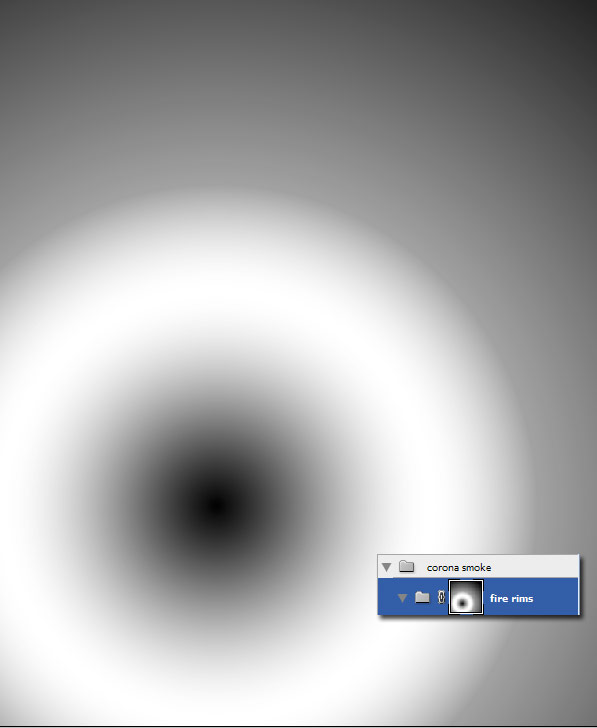
Step 25
In the "fire rims" group, apply a layer mask with a wavy gradient, as in the image below. Then use this gradient to cover the brightness of the sparks (coming up next) towards the center and the periphery of the explosion. This group was made to hold a Gradient Map in color dodge. So this is how you can add many Layer masks in one layer without destroying it - nest groups with Layer masks.
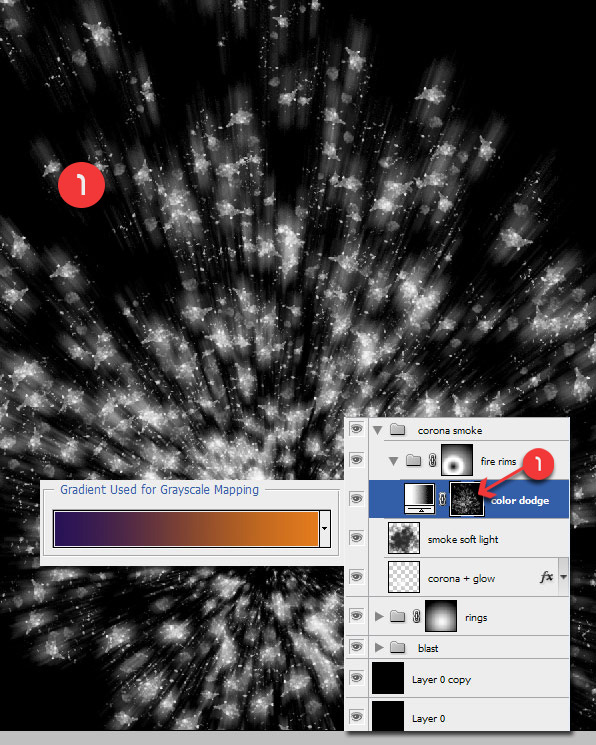
Step 26
Another good trick is used to make this Starfield. It's just a grunge brush in a smaller scale, stroked randomly, and with Radial Blur applied (Amount:20-25; Quality: Good; Type: Zoom and centered same as earlier blurs). Use this blurred Starfield as a mask to the Gradient Map. This will act as bright sparks when the blending mode is set to Color Dodge or Screen.
Step 27
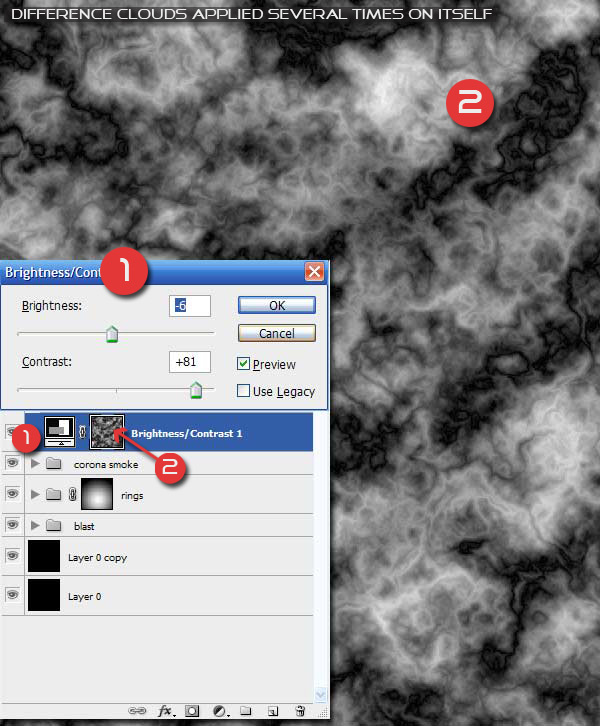
Now its time for a brightness/contrast layer, but again with a layer mask. This time it's easier to make. Just select the blank
layer mask (Alt+ Click). Then apply Filters> Render> Difference Clouds. Do this several times (Ctrl+F).
Change the brightness/contrast values as it suits you, and blend it in a contrast mode (Multiply/Linear Burn, etc.). This will improve the overall contrast of the image. However, the Difference Clouds mask will create some problems, for now just go to the next step.
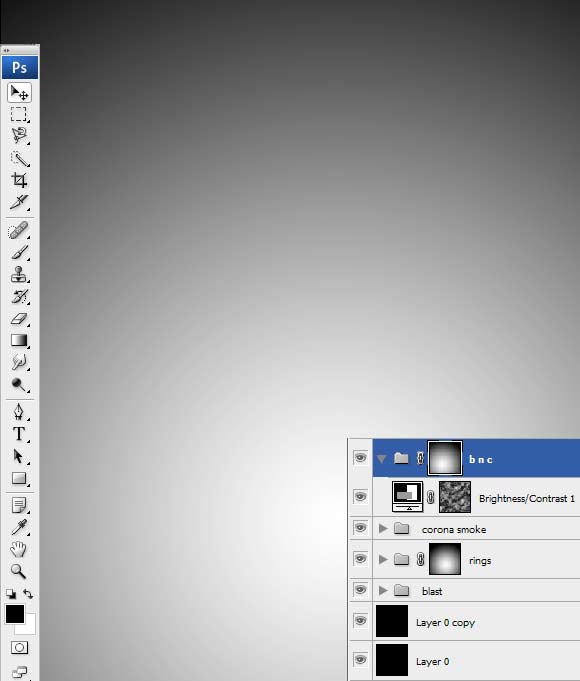
Step 28
The dense smoke effect that we have can be corrected by fading the smoke from regions which are already dark (those regions towards the outer rings). The easiest way to do it is by adding a Layer mask to the group, which holds the Brightness/Contrast adjustment layer. I created a group called "b n c," and applied a Radial gradient as layer mask.
Step 29
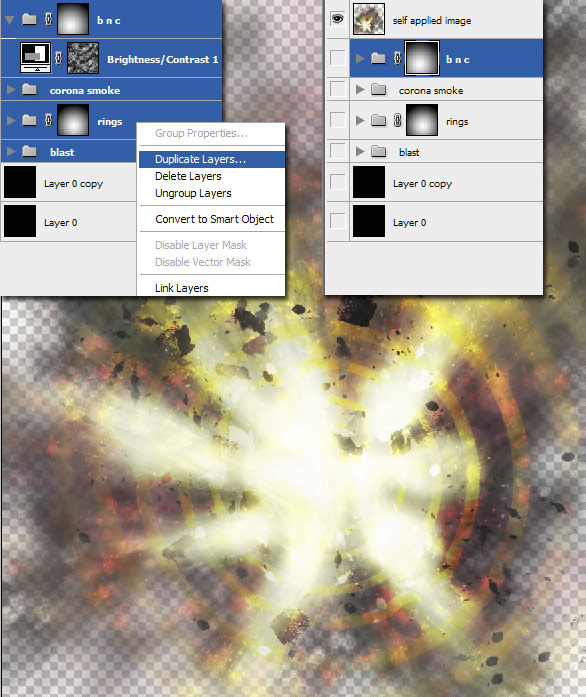
We have reached almost the end of this tutorial. So far we have got only translucent layers (except for the background). Select every layer above the black bg "Layer 0," and Duplicate them.
Then merge all these duplicate layers into one layer and name it "self applied image." If you hide all the other layers, but this new one (by Alt + Clicking on the eye next to it), you should get a result as the image shows.
Step 30
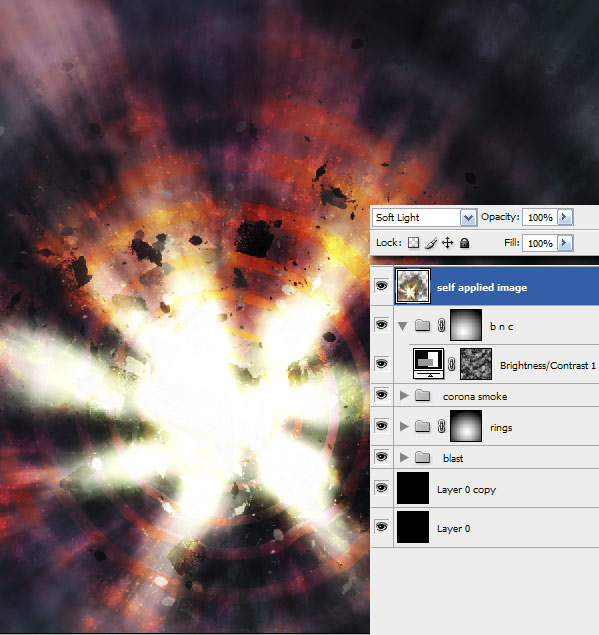
For the blending mode here use Soft Light.
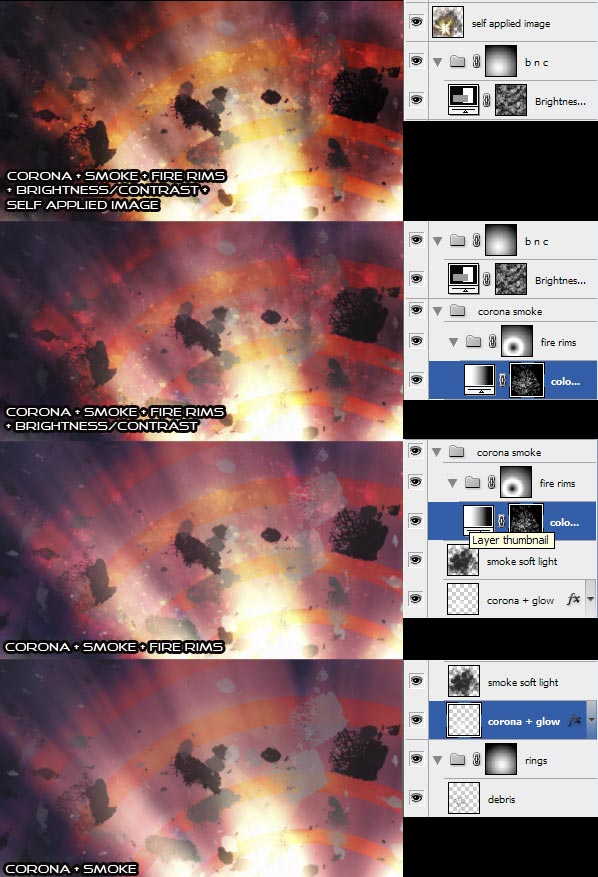
Step 31
The images below show a gradual transformation with each subsequent operation.
Conclusion
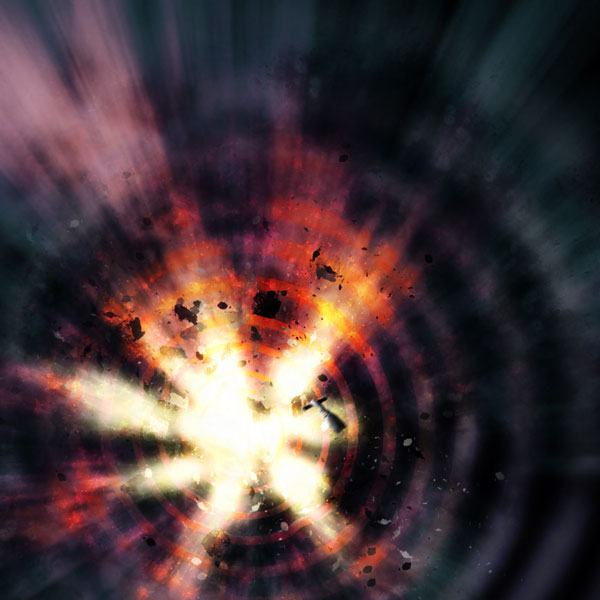
Have fun making your own explosions. The final image is below.
No comments:
Post a Comment